Wednesday, December 30, 2009

My Big, Fat, and Beautiful MAC Love

This year... MY MAKEUP STASH GREW! And I mean total influx of makeup grew. Wasn't it just a couple of years ago when all the makeup I owned could fit in a gym bag? Now I have two malettes and a workspace to hold all of them! I've started collecting and investing on high-end makeup brands at the same time learning more by buying books and reading stuff online and back issues of Vogue and In Style. Anyway, as the paying clients started pouring in, I slowly started investing on tools. I started with shadows and lipsticks and then moved on to basics like concealer, foundation, and then later on to brushes. I still have drugstore brands, although I can't help but have my own favorites.

Among my favorites, and also ranking my top favorite makeup brand is of course, MAC. I've always been fascinated with the MAC stores and then I see the pretty make up artists with their flawless makeup and brushes doing makeovers. MAC was the brand that inspired me to do makeup and remains one of my favorites up to this day. Also, guesting for MAC made me love the brand even more since I learned more about it and I learn about new products that I used to ignore in the shelves but actually work just as great. As of today, I'm officially a MAC addict, a MAC lover, and MAC collector.

When I got my MAC products from my most recent guesting, I decided to do an inventory of the stuff I have already from MAC. When I lay them on my bend, would you believe they practically filled up the entire space! I couldn't post the entire collection in a whole picture since it couldn't fit the frame so I chopped them into parts. So officially, here are my MAC stuff as of December 2009 (and growing and growing and growing):

Eye Makeup: This includes eyeshadow pots, eyeshadow palettes, brow sets, mascara, eye pencils, pigments, mineralize eyeshadows, paint pots, cream color base, and fluidline.


Brushes. So far I only have 3 full-sized brushes - 129, 242, and 217. I have all the red collection's brush sets and the Colorforms advanced brush set. Of course, the quality of the full size is different from the smaller ones but here, I love the 168, 187, 239, 219, 318, 190, 212, and 194.


Base makeup and highlights: Foundation (preferences: Mineralize Satinfinish, Studiosculpt set with Studio Fix Powder+Foundation), concealer, and mineralize skin finishes both natural and for highlighting. I also have the Emmanuel Ungaro beauty powder, which makes an excellent and matte blush. Yes, I have more than one shade since I handle a variety of faces, complexions, and skin conditions.


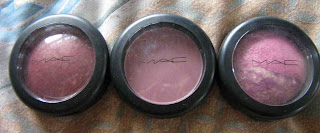
Three blushers. :) All in pretty colors. This I probably would need more of.

Skinsheen leg sprays were introduced to me by Sam and I love the healthy bronzey glow it gives me. Leg sprays warm up the complexion, and this helps if I'm doing shoots where I need to show some skin (a warm bronzey complexion registers better on camera) or when I'm wearing skirts or shorts and want that glow.
The strobe cream and strobe undercover smell really good and give my skin a fantastic glow before makeup. I just use a little amount as too much could be heavy.


My most favorite things in the world are.....LIPSTICKS! Most of the stuff here are from collections although I do have regular items like Viva Glam, Russian Red, Ruby Woo, and Blankety. I make it a point to also have a variety of shades, even outrageous ones like black, lilac, or deep plum.


So after documenting the makeup and packing them away, here's the funny thing... I discovered that there were some items that I forgot to take shots of:


Blot powder, Heatherette lipstick in Hollywood Nights, underlacquer base, and nail polish. Oh wow. :)

And that's my big, fat, MAC collection that's forever growing. :-) I'm actually still wondering what to get next. Brush? Foundation? Eyeshadow? Blush? Hmmmm.....

Captured By The Illuminati

Met also the Illuminati photographers, who also took shots of us. :) I get to wear a dress this time with my own accessories.

These shots were taken by Jong Clemente using available light. I love how the red necklace popped and so did my red lips. I made that necklace, by the way.

Marinel Locsin takes a monotone approach with lots of drama


Till the next shoot, you guys!

Feature photos taken by Marinel Locsin and Jong Clemente
Models: Philip Rudge Arca and Bambi de la Cruz
Black Dress: Isabel Ridon
Necklace and Makeup: Bambi de la Cruz

Year-Ender Shoot

Last Sunday, I was called to model and do makeup for a shoot. Without batting an eyelash, I was like, "Give me an hour to pack my stuff" I pulled out several dresses and a pair of heels from my closet and packed a makeup kit full of essentials before I dashed away, with my wet hair back and face hidden behind a pair of shades.

It was my shoot after the Holiday rest, where I spent the Holidays resting and gaining the weight I lost. After a week, I wanted to get back to work right away, and I mean shooting and modelling. What did you know, I did both today and I had a shoot with Manny Librodo, who I previously worked with Josa Quintas.

He and Melai picked me up in Starbucks near my place and we headed off to LGV. There's also another model by the way, and that's Rudge! We called him that day to join us, so there would be two of us to be shot by Manny. Last time I saw Rudge was earlier this year, after my stint as guest MuA at MAC and after his trip to Thailand. I was glad Rudge agreed at last minute, and we really did a lot of catching up.
I did makeup on me at the car to save time. So when we got to the location, all I had to do was do makeup on Rudge and attach my falsies. Rudge really looked amazing so makeup on him was quick and breezy. So what were the pegs? Well whaddya know... we went sexy this time. Very. very sexy. We were at ease with each other, having worked with each other countless times. We both have no qualms about going sexy in pictures as for us, it's work and we're both artists. Besides, working with Manny is an absolute pleasure. I love his treatments and he made these sexy pictures look tasteful. :)
This photo looks like an adventure movie poster. Plus it shows how thin I've become already.


The group picture also shows the people I've met in the shoot. I've worked with Melai with Manny before but I finally meet the Illuminati photographers, who I've only met in Facebook and now I get to meet them in person. :D I also met Ricky Ladia, who taught Manny how to do strobes.

Another little trivia, Rudge was the first model I've worked with this year, and the last one I've worked with for 2009. :) Isn't it cool? The shoot was really fun and with the good vibes, it was a definite success! Also, I love working with real artists who are professional with open minds and creative ideas. :)

Photo Credits:

  • Models: Philip Rudge Arca and Bambi de la Cruz
  • Photographer: Manny Librodo
  • Makeup: Bambi de la Cruz

Sunday, December 27, 2009

My Top 3 Eye Blending Brushes

One of the key techniques in creating flawless eye makeup is blending. Blending could make the colors flow naturally on the skin instead of the ugly, harsh, clownish, highlighting-pen lines we always see. Blending colors impeccably is achieved not just with the perfect blending hand but also the perfect tools. The #1 spot to blend colors is the crease. As we all know, Asians have a very shallow crease as compared with Caucassians hence the obsession of simulating hollows with contours. Done the proper way, a proper crease contour could result in an eye-opening subtle contour. Done wrongly, it's just going to look weird, clownish, and drawn-in.

So what's one secret of good eye makeup? TOOLS! I believe in investing in the right tools because they really make a difference. I've bought cheap makeup brushes but I end up hurting my face or getting really bad makeup blending because they weren't the right tools to use. For blending, it's best to use a fluffy brush. A dense, flat brush is good for depositing color. Fluffier brushes are best for blending. Plus, they poke the eye less.

Here are my top 3 weapons for eye blending, which have been tried and tested. I only got to reviewing this now (one of them I've owned for a year) since I really do test runs plus discover new ways of maximizing them.
As you can see, they've been already used for quite a while, and so I've got more to say with these babies. :)

First up is MAC 217.
MAC 217 retails for Php 1,100. I've had this for a year now, and in fact, it's my first MAC brush ever. I love how soft it feels, and also, it's very much raved about by a lot of people but I only got to really discovering its efficacy from MAC artist Owen Sarmiento. He used it to blend color, especially if I'm using only two colors on my eye. It's fluffy enough to blend colors seamlesly, yet it still picks up product so I could use this for sheer deposits of color. He even uses this to blend paint pots and MAC Prep+Prime eye. MAC artists call it the Harry Potter wand, and it sure is. I guess it was the right choice when I chose this as the first MAC brush to own. It's just stained from colors yet the quality of the hair is still the same from when I first bought it.

This pink baby caught my eye during the Rockwell Moonlit Bazaar last October when I visited the Beauty and Minerals booth. I was looking for a new tool since I was then gonna be off to do makeup for Spring Awakening that day when I saw this baby. Made of goat hair, this can deposit pigment since it's stiff enough to grab products such as powder eyeshadow (like the blue blush in my Feathers post) yet it's fluffy enough to blend crease and contours for smoky effect. Another use for this is nose contour. I dab it a bit on my MAC Mineralize Skinfinish in dark and run it lightly on the sides of my nose. It looks like a hybrid of MAC 217 and 224. The pink handle is cute in my brush roll too.

Another thing to love about Charm is that they're affordable. This baby retails for only Php250. However, this does not sacrifice quality, as they've performed at par with my expensive brushes.
For those who are having a hard time maneuvering with the 217, I recommend this deluxe eye brush, which retails for Php380, also from Beauty and Minerals.

I like the fact that it's small so those with smaller eyes and shallow creases could use this better. The hair is made of pony hair, which is softer. It could deposit color too but it's soft enough to blend. I use this to put color and blend on my outer crease and further blend colors with my 217. This is helpful for creating my 3d smokey eyes. since after I do my contour color, I deposit a tad of black on the outer edge of my eye and blend upwards.

Always remember though, that to make sure the brushes really last a lifetime, that we should always take care of them by cleaning them at least once a week and storing them safe in brush rolls so they retain their shape. :)

Friday, December 25, 2009

How to Deal with Mineralize Eye Shadows

One of the complaints I have with mineralize eye shadows and also some of my clients is that they're too sheer and they don't last that long on the eye. Actually, mineralize eye shadows are sheerer as compared to the traditional eyeshadows we buy individually. I've been trying to work my way around them as to how to sell them when I'm in the store or when I review them.

Actually, a few days ago, I was playing with my new toys at home when I decided to use just purely MES on my eyes. I figured that a pigmented look is also possible. So here's how to make use of the MES and make them stay longer:
I use a base. As an alternative, I use an eyeshadow base in a cream formula. Shown here is MAC Cream Color Base in a neutral color like Shell. Although this is no longer available locally here, try a neutral-colored cream eyeshadow, an eyeshadow primer, or a base. I use little only of the cream color base because too much of it causes my eyeshadow to crease, which isn't a pretty sight.

Anyway, for tools, I use a densely-packed brush to deposit the product on my lid. I like the MAC 239 brush (left) and my The Body Shop eyeshadow brush (right). This brush is from the Nature's Minerals collection, since the bristles are dense and stiff enough to grab the color from the pan and effectively deposit it on the lid. What I do is just pat the brush on the color, then pat on my lid, layering for intensity. Just deposit, deposit, and deposit.

Now, since depositing does give better color payoff than sweeping, it also leaves harsh demarcation lines. What I do is that I get a fluffy brush to blend the edges of the color, making the eye makeup seamless, so there are no harsh demarcation lines.

Let's compare the intensity of color with two swatches:

The color holds so much better with a base(left) rather than without (right). Without base, there's hardly a hint of color and the product comes out rather powdery.
I'm glad that with a few experiments, I could maximize the use of my products. Actually, I figured that the MES can be great for bridals or daytime looks or in combination with our traditional shadows since they give a healthy amount of shimmer if used properly.

REVIEW: Barbie <3 Stila Smudge Pot

For this Christmas, I would like to review one of my Christmas gifts, and my first-ever Stila product. I've heard great reviews about this product plus the fact that it's pretty much affordable. What got me to say, "I HAVE TO HAVE THIS!" just recently was the fact that my favorite doll brand, Barbie, did a collaboration with Stila. As Barbie now has a collaboration with another brand after two years, I just had to follow her. I did grow up with Barbie. I owned a boxful of Barbie dolls and I still have one in my shelf. It was the Barbie doll that brought out the girl in me, and probably one of the biggest influences in 80's pop culture.

I was at the Stila counter and I was searching for what to get from the palette when I decided to strike two birds with one stone: I still don't have a black gel eyeliner and I've been intrigued with Stila Smudge Pots, being used both as a gel eyeliner and eyeshadow base. I asked if they had a black one and they did... the last one on counter. It was fated to be mine!

Isn't the holographic Barbie eye that opens and closes depending on how you move the pot cute? No way am I gonna throw this away when I finish the product, na-uh, na-uh *shakes head and pouts*. By the way, for those who want to know what smudge pots actually are, a smudge pot is a gel eyeliner, but it could be also used as an eyeshadow or eyeshadow base, depending on the application and blending.
I got the shade Little Black Dress, the black one in the collection. The color isn't actually stark black but it's black with a bit of pink shimmer. The shimmer is pretty subtle, and you don't get chunks of glitter, as you see in the swatches.

Using this as an eyeliner, I recommend using either a flat brush such as MAC 212 or a stiff angled brush like MAC 208. If you find one layer too sheer, as it could be, you can add 2 layers more (like the middle swatch) so it looks more opaque. The pink glitter actually gives it a bit of an eggplant-like color so it could appear darker in black-and-white photos. As an eyeshadow base, it's best applied with a flat synthetic brush like MAC 195 or with your fingertips and smudged and blended, just like what I did in the third swatch.
And yes, it's waterproof, budgeproof, and smudgeproof once it sets. I placed my hand under running water and smudged it a bit and this is how the swatches looked like right after:

Still with water droplets and still it's intact with minimal smudging, since I think I rubbed my hand a bit too early before I let the swatches set. I do recommend to preserve its shelf life not to leave the jar open for a long period as this could dry up the product, just like in all gel liners.

The price of one smudge pot is Php 895 for 4 grams and it's available at all Stila counters at Rustan's Department Stores here in Manila. The Barbie variety is only limited edition, yet there are the regular smudge pots available still on counter. So price isn't that bad and a little really goes a long way. Remember though not to pile on too much product, especially if using this as an eyeshadow or eyeshadow base because it could crease, cake, and crack.


When to use this:
1. As an eyeliner if going for cat's eyes. It's okay to use for evening bridals, as I still prefer a classic dark brown for daytime bridals.
2. As a base if you want an intense black smokey eye especially for long outdoor shoots or fashion shows where makeup can melt in harsh heat conditions and hot photography lights. A bit of shimmer helps eliminate the solid black-eye panda effect.
3. A subtle smoky eye on the go- just pat a bit on the lid and blend.

Other shades available:
1. Purple Pumps - Purple with Pink Shimmer
2. Cobalt Clutch - Blue with Blue Shimmer

Wednesday, December 23, 2009

Feathers

A preview of my shoot last Sunday with Rachel Lobangco and Leo Castillo. Set design by Rene Labrador.


The blue stood out among the earth colors. This was a total battle of the lashes and feathers, mixed media which I haven't done before. I like work that's both challenging and fun. I had practically zero sleep the night before and by this time, I guess I've already been awake for more than 24 hours. Somehow, my lack of sleep pounded me to do a good job still. Plus they really took care of me well. But hey, health-wise, I should be hitting the sack soon.

Photo credits:
  • Model: Rachel Lobangco
  • Makeup: Bambi de la Cruz
  • Photographer: Leo Castillo
  • Set Design: Rene Labrador

That Christmas Wishlist

It's 2:30 p.m. and I got myself planted right at home. Last weekend and the week before that was pretty tight with work and shoots - models being shot before the Holiday feast comes and traffic has been horrible I stay at home if I got free time. Anyway, I'm done with some of my Christmas gift-giving and I'm out to finish my Christmas shopping in a bit. If only I could just order stuff online last minute as I'm so lazy to get out.

Anyway, I still haven't written my annual Christmas wishlist, as I have during my birthday and Christmas, to answer the question "What to get you for Christmas?" of course makeup is in the list as usual, but suprisingly, I've decided to limit it. Before it was like, "ANY!" Now, I have to re-evaluate on the stuff that I still don't have. So here goes:

1. Makeup Brushes. MAC and Bobbi Brown. They're the brushes that I know full well. I'm talking about full-size MAC brushes as I'm already complete with the short-handled ones that I want (the red collection). I thought the full-sized ones would be cool. For MAC, I'd like 187, 188, 116, 239, 217, 252, 208, 227, 224, 191, 195, 168, and a big poufy powder brush (I still don't remember the name). For bobbi brown, it would be the lip brush, eyeshadow sweep, gel liner brush, and bronzer brush. Of course, the red brush from Shu Uemura is one thing I'd like to have in my case. I think it's about time I start having the investment brushes now.
2. Makeup - as far as I'm concerned, I'm happy to get key items now since I already have a lot of eyeshadows and most especially lipsticks. For foundation, liquid foundation and two-way powder foundation. For liquid, I prefer MAC Mineralize Satinfinish and MAC Studio Sculpt. For Powder, as usual it's MAC Studiofix. I already have NC25 and NC45 (lightful). I need just the following shades: NC35, NC40, NC42, NW25, and NC15. I like also Paul and Joe moisturizing compact foundation and their two-way powder foundation. Foundation is for my clients since I need a variety of shades for various skin colors. Eyebrow makeup too, like Shu Uemura hard 9 pencil, MAC eyeshadow in charcoal brown/espresso, and Make Up for Ever waterproof eyebrow corrector. Foundation and eyebrow makeup first, as far as consumable makeup is concerned. :)
3. Shoes - seriously, I need more classic comfy shoes and heels. I don't even have a pair of sneakers yet. dear me. and a good pair of jeans too, while at it. It's so hard to find my size, that's why.
4. A Macbook Pro, because Mr. Producer is slowly convincing me to go to the dark side.
5. Black outfits, for obvious reasons.
6. More work. More work. More work. More work internationally too.
7. A large-barrel curling iron, like a 1-1/2 inch or 1-inch curling iron to create soft curls. My curling iron is too small to create those.
8. A new phone. Personally, I'm eyeing on an E71. Not because of luxury or it looks cool but due to necessity since my Globe phone's memory is about to be consumed due to the increasing number of contacts i have. I figured it's good enough for my lifestyle plus it's not touch-screen. I can't use a touch-screen phone since my hands get dirty a lot and that would just make the phone conk out on me. Plus it's huge enough to be spotted in my endless abyss of a bag.
9. Good luck, good karma, and good vibes.
10. A trip to the beach because seriously, I need a tan. 1-1/2 weeks spells heaven for me awredi. Doesnt have to be international, even.

Monday, December 14, 2009

Winged Eyes for Sarah Gaugler's UNO Cover Shoot

Sarah Gaugler's trademark winged eyes, make an impact as she sports them in her UNO cover for this month:


The sculptured curls give it a classic vintage pinup girl look and the whole look has a mixture of Dita Von Teese and Amy Winehouse. The wings add an instant lift to her eyes, accentuating the shape. It actually gives her an approachable and friendly look.

To take the look to everyday wear, it's best to frame the face with defined eyebrows. Use brown eyebrow powder (or matte eyeshadow) two shades lighter than the head hair color (even for defined brows, never use black or gray). The tail end of the brow will guide you on how you want the wings to be. Prime lids with an eyeshadow primer and sweep a nude or bone-colored eyeshadow from lashline to crease to neutralize the lid color and to awaken the eyes.

For the wings. I recommend using a gel eyeliner because it's easier to manage than liquid yet it gives that same definition. To create that winged eye, here's the trick: work backwards. Instead of lining the eyes the traditional way and flicking the outside corner for the wing, we'll make the wing first and go inwards, so it's easier. Start from where you want the tail to end (or shorter) then drag the brush towards the inner lashline. Fill in the gaps with liner and edit the wing as necessary to make sure that both eyes are even. Line the bottom lashline with gel liner to "close" the winged look. Errors can be corrected with makeup remover and powder foundation.

The eye makeup can be finished off by highlighting the inner corners of the eyes with the same color used as an eyeshadow base and lots of mascara on curled lashes. To enhance the wing effect, False eyelashes can be used. Half-length lashes enhance the wing shape more. Cheeks can be highlighted with a shimmery highlighting powder since this can enhance the "lifting" effect of the wings.

Perfecting winged eyes like Sarah's takes a lot of practice. If you don't get it right the first time, it's okay. Adjust, erase, and try again. When you get better, you will develop your own preference, technique, and style. Try making the line thicker or thinner as you wish. Although black was used here, feel free to experiment with other gel liner colors like copper, brown, green, or blue.

Sunday, December 13, 2009

A Series of Various Events

I've been having photoshoots much and I'm glad for the influx of work volume whether it be a collaboration or a paid client because I get to not only express my creativity and earn but I get to refresh my skills as well. I guess this week a lot of things happened and here's a lowdown.

Last Friday (that was last week, not the Friday 2 days ago), I had a collaboration with Dennis and Andy. I was on my way to the location when I was about to board a bus to Buendia (yes friends, I do not drive going to far places because I'm a lazy person) when I saw that the bus was almost full. No way am I going to stand for God knows how long with my backpack, malette, and bag since it would be a hassle so I decided to go down. Just as one foot was on the road, the bus sped dragging me halfway so I was thisclose to almost getting myself slammed on the pavement. I made through it alive though but I kinda injured my shoulder, knee, left wrist, and got a bruised hip. I hailed a cab to the location and waited for Dennis, Andy, and our model to get there. When they got to the location, we saw that we had about less than 2 hours for the shoot so I had to do makeup fast. So makeup was done and so we shot

Andy at work
Dennis doing behind-the-scenes shots of our model, Victor C.


and my version of BTS. :) Okay, of course Andy's shots are way better. We finished right on the dot. We parted ways and Andy and I hailed a taxi to Makati where we had lunch first before we parted ways. After that, I headed off to my client shoot and as soon as I re-packed for my shoot the following day.

I had a shoot the morning at BF Paranaque with Christine, Jhenn, and Mark before I headed out in the afternoon for the Olay event, not breaking any bones this time. After the event, which I blogged previously, I had lunch with Romina before we did some window shopping at The Ramp and MAC. I got home in the evening for my stuff to take a rest.

Work began for me on Tuesday where I guested at the MAC counter in MoA, again. Mall hours were extended so I got to stay in the mall at 10 p.m. Sales were pretty much okay, for a weekday, and it was funny to see that the mall still alive even at ungodly hours. It was fun actually, and I did enjoy my stay there. I got to wear MAC Diva lipstick again. Yeah!

That Wednesday, Mike and I had a shoot with Rachel. It was a whole lot of fun, with Rachel being as cool as ever. It was her first time to meet Mike and they got along quite well. She loved the photos! :D

Actually, these are photos taken using Rachel's camera. My camera conked out AGAIN and had to be taken at the service center since the lens went berzerk, stressing me out. It worked perfectly fine at the Olay event but the lens sorta decided to die out again. grrrrrr!!!!! Anyway, the good news is it could be repaired in a week or two. The bad news is, it's no longer under warranty so I had to shell out dough. AUUUUGH! Ironically though, being under warranty takes longer for repairs.
Friday was another busy day. I had a shoot with Rachel again at Sta. Lucia so I met her at her house where we both went to Sta. Lucia. When we made our way back to Ortigas, traffic was really bad, we were stuck on the road for a good 2 hours. When I got dropped at Galleria, I lined up to get a taxi to my client in MANILA. For some weird reason, taxi drivers were pretty lazy at getting passengers and the line was insanely long. When I got my taxi, I was lucky that he agreed to take me there but man... traffic was hell at every single place, even at side streets. I was panicking already since I was way late beyond call time. Turns out, everyone was late and stuck in traffic and everything was so slow, which was unusual. By the end of the day, I was really tired, and stressed from all that traffic.
I guess this week had a lot of things happening for me. Although I did manage to weasel in a few misfortunes - my bus accident, the camera conking out, and the horrid friday traffic, I still got my shoots and collaborations and lots of work to balance it out. :) So happiness was there too.
The week's starting for me now. Hope it turns out well!

REVIEW: MAC Smoke and Mirrors Eyeshadow Palette

A good day-to-night neutral palette sure is hard to find. However, once I set eyes on the Smoke and Mirrors eyeshadow palette from this year's Holiday Collection, I knew that it was going to be one of my most highly-recommended eyeshadow palettes for those willing to invest and would want to start off with a good day-to-night makeup. So, when Mike was out shopping for the studio at the MAC Rockwell counter, he asked me what would be a good neutral eyeshadow palette. Well, you all know now what I recommended. :)

So I borrowed the palette for the weekend so I could review it finally. And so, here it is.

Check out the neutral colors without the shimmer and glitter overload:


And swatches of the shadows too:Clockwise from top left: Fire In Her Eyes (Frost), Wide-Eyed Wonder (Frost), Black Magique (Veluxe), Spell No. 9 (Satin), Deception (Frost), and Smoke and Mirrors (Satin)

I like how the finishes are not that overpowering with shine but they still have a bit of shimmer with the frost and satin finishes. Colors are quite muted and conservative, which are perfect for first-time eyeshadow users. In fact, this was the eyeshadow palette I used during my neutral look demo when I spoke at Atelier De Maquillage. It's also a perfect day-to-night palette.

However, the color payoff isn't that intense as you could see in the swatches and they come out quite sheer considering I swatched this with a dense 239 brush. is that if you want color intensity, using this alone isn't recommended. No, I do not recommend and never will recommend the wet application technique. What do I recommend for intense color? A good eyeshadow primer like MAC Paint Pot in Painterly or Fresco Rose (I use Fresco Rose curently), MAC Prep+Prime, MAC Cream Color Base in Shell, Shu Uemura cream eyeshadow, Laura Mercier Eye Basics, and the infamous UDPP. I prefer the Paint Pots though because they're waterproof yet glide on smoothly and really, the colors are crease and practically everything proof. The palette comes with a 213 SE brush, but of course, I highly recommend getting 239 and 242 for packing the pigments in and a 224 brush to blend the colors to a seamless finish.

Fire In her Eyes happens to be a matte and universal highlighter. I consider Smoke and Mirrors to be a double-purpose color, since I also use this as eyebrow powder makeup, since it's relatively matte and the color still remains subtle. I use little amount though, and I top this to my eyebrow pencil or cream, if I want my eyebrow makeup to be insured. Black Magique doesn't come out as intense black as Carbon or Kryolan Black (two of my absolute favorite intense matte black colors) but for a subtle smokey eye, or for those afraid of going all out black, this could be a best "beginner" black.

Here's a quick tutorial for a good daytime look:
For a five-minute glam, after prepping eyes with eyeshadow base, apply Spell No. 9 on the lids with a 239 brush and highlight the browbone with Fire In Her Eyes. Contour the crease with Smoke and Mirrors mixed with Deception (Deception mutes Smoke and Mirrors a bit so the brown isn't too dark) using a 217 or 224 brush. Blend, blend, and blend so it doesn't look clownish. Tightline the top and bottom lashlines with a waterproof brown eyeliner like Technakohl in Brownborder and for 100% sure staying power, set the liner with Smoke and Mirrors. Define brows and then curl lashes and apply 3 coats of lengthening mascara.

This looks subtle but the eyes are defined and awakened without looking too overly made up. It goes well with any lippie color since it's quite neutral. I used this tutorial yesterday with my MAC Viva Glam V and I like how subtle it looked since I went out looking casual that day.

Retail price for this is Php 2,800. This is a limited edition palette available only for the Holidays and only when supplies last.

Saturday, December 12, 2009

Olay Regenerist Micro-Sculpting Cream: Super Cream, Really Super Stuff

Okay, I get it ageing is inevitable. However, thank you to technology, scientists who study cells in the lab, and cosmetic and skin care companies, okay, and photo-editing, ageing can be concealed, prevented, and slowed down. Hence, my obsession on anti-ageing regimen, skin care, heal, clone stamp, and gaussian blur (but not too much on the gaussian blur). When Olay Regenerist was introduced to me a year ago, I fell in love with it and no one knows that I'm nearing the big 3-0, and it's been easy for me to lie about my age, even if I don't.

So just imagine my thrill when I got the invitation to the launch of a new addition to the Olay Regenerist family: the Micro-Sculpting Serum, which happens to be a Super Cream for anti-ageing. Super Cream? Oooooohhhh..... this I gotta see. I told my contact that I would be late but I would definitely make it since I would be dashing off from my shoot in Paranaque. As soon as I got off my shoot (I was happy that Seph and I were able to get a taxi willing to take us to Makati and it was okay for Seph to split a taxi ride with me), I rushed to the event and deposited my godzilla equipment to outback so I could cover the event too.
That's Angel Aquino holding a jar of the Micro-Sculpting Cream, How I wish the giant jar behind her was filled with the cream, though. Hahaha. Angel is definitely beautiful and timeless. Her makeup was simple and fresh with her hair tied back. She did her own makeup herself. :) Up-close her morena skin is just impeccable and flawless. She's also a fun and positive person and she even chatted with us for a bit. She even complimented my look. Okay, I can die happy now, but not yet.Of course, I wouldn't pass up an opportunity to have a picture with Daphne Osena-Paez, another Olay ambassador.


So anyway, going back to the cream, the Micro-Sculpting cream promises to keep skin hydrated longer, and it's more potent giving benefits as fast as four days. In fact, it was tested in the lab outperforming several other more expensive creams, even the super-expensive ones. This cream is currently priced at Php 1,299. During the event, they had a promo that if you buy one with a friend, you get one free, so that's a really good deal. Plus, this is one cream that I have to experience. I was recommended to use this as a night cream in place of my Olay Regenerist night cream, since I'm already done with that jar.


I got home and did a patch test on my forearm before I went to bed to see if I had any reactions to the product. Turns out I had none (yay!), so I proceeded to use the product. I could feel that it's richer as compared to the predecessors yet it's not heavy or greasy on my face. It glides on quite easily too. Another recommendation I had was to spread it well after I apply it on my face, since this is more potent than most of my usual creams, too much could result to redness on the skin. Scent was also very light, I didn't get any migraines from very heavy scents. I also like the fact that I didn't wake up with sticky skin or felt like my skin was suffocating from all the heaviness.


So far, after four days, I'm really liking the product. I've noticed improved smoothness in my skin and some of my lines diminishing. For a very potent product, I didn't break out from this. I tried using this as a day cream, and it works quite well. I'm not feeling any heaviness or sting right now, yet I do couple the use of this cream if I'm using this during the day with sunblock, especially today, where the sun's quite high.


I guess for the performance, the price is really a good deal. Some of my clients tell me that they spend tens and thousands of pesos for their creams and laser treatments. When I shared to them my knowledge and first-hand experience, they immediately wanted to try this too. I even removed my makeup and showed them unedited pictures of me without makeup to show its result on my skin. I recommend this though, for women (and men) my age as this could be too strong for teenagers. This is one line that has won my loyalty and I've been loving its effects.

BLUED Shoot: Whee!!!!!!!


This shoot was done a few months ago, but I just got to posting the materials and behind-the-scenes when the official materials are out. What's the shoot? It's the shoot for BLUED. :D

I'm talking about the clothing company that made waves during the 90's, and it still continues to be a hit until now. I did own a shirt before by BLUED (a hand-me-down). Now I get to work for their campaign! Weeeeeeee!!!!!!!!

Plus, I get to work with one of my fave photographers. The shoot was practically the whole day, but it was really fast. we shot like 3 racks of clothes, and the photos were awesome.

The look for the day is cool, clean, casual, and carefree. So I made the models look fresh and glowing.

Here's the BTS footage I did during the super fun shoot.


Thanks to Mike for holding the camera on the instances where I asked to be on camera. The camera is back at the service center since my lens conked out again. URGGGHH!!!! Need new cam and need a little handy video cam too (christmas gifts please, and a lappy with windows movie maker)

And here's where you get to see our work, thanks to Rafa for sharing these to me. I dunno yet if they have it on ATC or Glorietta. Last week, it wasn't up at ATC, but they already have it in Trinoma.


Yes, I recommend their clothing being affordable and comfy. :)

Tuesday, December 1, 2009

MAC Celebrates Viva Glam 2009


December 1 marks not just the first day of December and we've got but only a few weeks left before our Christmas shopping but also World AIDS Day. My favorite brand of all time celebrates this day donning the purple shirt and going Viva Glam. More than just a makeup brand, MAC also has programs that are more than just prettifying ourselves with a sweep and a pat. I've already blogged about the Back To MAC program (and those who have seen me guest at the stores have already heard about it). Here, what we're gonna be talking about is the MAC AIDS Fund.

This program was created in 1994 to support men, women, and children affected by HIV and AIDS. The MAC AIDS FUND provides monies to non-profit organizations globally in support of direct services (food, housing, health care, etc) as well as education and prevention programs.

What fuels the funding is actually the sales of the MAC Viva Glam lipsticks. The MAC Viva Glam lipsticks have been endorsed by international celebrities such as Pamela Anderson, Elton John, Dita Von Teese, Eve, Lisa Marie Presley, and right now Fergie of Black Eyed Peas. Every cent of the retail selling price of Viva Glam lipsticks and lipglasses (and this holiday season, lip palettes) is donated to various AIDS programs in the communities where the product is sold. To distinguish a Viva GLam lipstick, check out those in a red tube.

For this year, MAC invited celebrities such as Marc Nelson, Rovilson Fernandez, Hindy Tantoco, Alexi Alunan, Jinno Rufino, and Cecile Van Straten to share with us how we could help the MAC AIDS FUND, by purchasing a Viva Glam lipstick. The shades are really very wearable, with colors ranging from a bold red to a pale nude color.

As I arrived at Glorietta, the MAC store was decorated with Viva Glam paraphernalia. Fergie was on display too.

Of course I would definitely wear black for this day, as it's been MAC's standard color. The white sash came with that shirt and I still kept my outfit 95% black.

And check out how the fabulous MAC team wore Viva Glam lipsticks.

Ever-so-fabulous Rizza sporting my favorite Viva Glam I.

The bright red makes a bold statement on its own, so Rizza's eyes were kept neutral, but still flirty and feminine with winged eyeliner and lots of mascara.

Cyndee shows how to wear Viva Glam II without looking pale. Love the blue smokey eyes to accentuate her eyes. Viva Glam II is prolly what people would want for the nude Jolie-esque lips.

As I already purchased Viva Glam I earlier, I was searching for a lipstick that's still natural but not too pale, something I could still use for bridals without washing out the lip color. Until I found my choice in Viva Glam V and guess who sold it to me?


yep, I bought that from Marc Nelson (weeeeeee! :P), and he's holding out the lipstick that I bought. Viva Glam V is actually pink with a bit of brownish undertone so it's perfect for weddings and prenup shots. The finish is actually frosty instead of matte and I'm assured of a relatively long staying power, with my experience from MAC lipsticks, all having less time to retouch. I have actually the lipglass variety of this one, which is about to run out, so it's good to have a backup tube. More of this lipstick soon.

Of course, what would an event be without pictures?

Me, Lyn of MAC Makati, Kang, Sam, Owen of MAC MoA, and of course, the lovely Mikee.
Mikee and I. I'm currently wearing Viva Glam I on my lips today.
Me and Rovilson Fernandez. Hell yeah I'd buy if guys this good-looking would be there at the counter too selling.

Viva Glam lipsticks aren't just for prettifying the lips but they're also a good cause. :) Be sure to catch the Viva Glam lipsticks and limited edition palettes on counter.