Happy Fourth of July everyone! Although it isn't a Philippine holiday, my friends (and readers) in the US celebrate it, so extended (virtual) fireworks here too!!!!! Today, I was inspired to make a tutorial, from a very festive song that's very much apt for the date. I chose to make a tutorial inspired by Katy Perry's look in her music video Firework.


I watched the video a lot of times so I could have an idea on how the makeup is like (not to mention how I love the song. It's currently my ringtone ) and downloaded the stills above so I could check my progress during my practice sessions. The look is very easy, actually, and for my version, I try to use as little color as possible, but I ended up with four colors. The four-color version is the easy way of doing the makeup. It's achievable to do the eye makeup with only two colors. The extra two are just "cheats". If you get better and master the art of blending, it's easy to accomplish this with only two colors.
Anyway, I started off with the easy part, which is to create an even canvas with foundation, concealer, powder, and contour. Katy Perry has a very flawless complexion and we'd want to mimic that. After setting everything and giving the face dimension, I defined my brows. Katy has such defined brows, but since it was dark on the video, I wanted to make the look more wearable by using taupe or brown eyebrow powder to define brows. If you have an arch, make sure it stands out like Katy's but not too over-the-top. In my case, I defined the tail of my brows with pencil, so there's more shape.

To make the eyeshadow stay put and glide easier, I applied eyeshadow base. I used Laura Mercier Eye Base in Eyebright and blended this from lashline to browbones.

Now it's time for the base color. I chose a shiny color like MAC Nylon, since that really really pops against matte black. I applied Nylon from lashline to browbone, basically the whole upper eye area.

By the way, don't forget to apply some loose powder on the undereye area to capture any eyeshadow fallout that might occur.
Next up is a cheat technique to define the crease. Using a silver-gray color (like MAC Arctic Gray), sweep this up in a windshield-wiper like motion on the crease of the eye, from out to in, to get that hollow slightly defined before going to deep black. To contour the eye, I used a fluffy round brush like Bobbi Brown Eye contour brush which gets the color deposited and blended easily.

The tricky part comes next, is where the black eyeshadow for depth comes in. The easy way to get this done is by the deposit-and-blend technique. We deposit the pigment first on the eye with a stiff brush and then, with a fluffy brush, blend this so we get a nice and smooth transition. Gets? Okay, so using a narrow and stiff brush (I like using a pencil brush or a MAC 219 brush), get some matte black eyeshadow powder (I used Kryolan black) and apply this on the outer corner of the eye carefully, just dabbing on the area you want it concentrated.

Remember to apply only little product at first and add on as you go. As you go by this step, you'll see why I wanted to apply loose powder on the undereye. It captures the little black speckles as you go along. So after that, your eye has to look something like this:

It kinda looks clownish and weird though, some might think panda effect. But wait, we're not yet done. To get that flawless look, get a nice fluffy eyeshadow brush (my weapon of choice is MAC 217) and.

BLEND LIKE YOUR LIFE DEPENDED ON IT!!!!! Blend till you get a smooth transition of colors. You could adjust as you go along, adding more black and blending, until you get a really nice transition of colors. You could adjust by adding more nylon too, if the black got too far. Just make sure that the blending's all nice and seamless. By the end of that, the eye should look something like this:

As you go along, you'll find out that you'll get better, and you can survive with just Nylon and black.
Anyway, here's another trick if you want it less dull. The secret is wedging in a bit of green on the outer corner and blending it well, just to create dimension so the black doesn't look so flat and dull. I used The Body Shop color in #43, a nice and sparkly dark deep green color, and applied it in the area shown, and then I blended it too, so it doesn't look like I schplunked some green that it looks out of place. That's another cheat technique.

To further smoke up the eye, line eyes with a soft and smudgy black eyeliner, like this Kajal eyeliner in black. since kajal eyeliners tend to be super smudgy, insure that it stays put with black eyeshadow powder. Clean up by dusting off loose powder.

So lashes do not get lost with all that makeup, Curl them and apply a mega-pumping mascara like Cover Girl LashBlast fusion. Falsies are encouraged, but you could do without them if you wish.
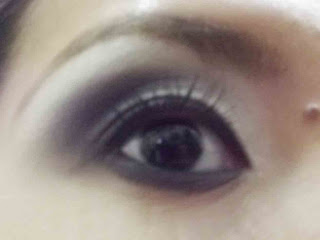
Eye progress so far:

The rest is easy. Choose a candy pink blush with some sheer slight shimmer and sweep this on the apples of your cheeks. I used The Body Shop in Vibrant Rose, a nice sweet pink color that looks like a healthy flush on the cheeks.

For lip color, I wanted it to match the cheeks. You could go by a sheer plum color or if you want, a nice magenta color like MAC Spitfire would do. Just don't make it too matte.

So here's my Firework-inspired look:

So here's my Firew0rk-inspired makeup tutorial for you girls. with a look like this, it's best when worn with confidence. Don't be shy with that smoky eye. Break off the mascara and gloss habit and try a look like this. Have fun!
3 comments:
Hi Mare!
Can I repost this on Kikay Exchange? With a link back to you of course :)
yes of course jill! you seem to have a lot of Katy Perry fans in your blog :)
Thankeeee!
Post a Comment