Showing posts with label smoky eyes. Show all posts

Friday, February 12, 2016

Brown Smoky Eye Tutorial

Hey everyone! It's the weekend again. I'm experiencing major DOMS right now since I've been working out everyday following my monthly calendar and even inserting some pole training after my workout (gotta take advantage of being warm!) today is rest and recovery day and I thought of doing  a makeup tutorial. I haven't done one for so long so I'm like, why not, right? So here I go.


This look is pretty easy and doesn't use a lot of loud or crazy colors. I thought I'd go classic this time. It can be used by anyone and can be worn if you're going to prom or attending a wedding or even just going out to meet friends. This is called the brown smoky eye, which, obviously uses a lot of browns and here, I made browns look not boring. When I was starting out with makeup, I used to hate browns because I found it so boring and blah and reserved only for the lolas. But really, browns are amazing because they go with any color. And yes, browns can be made smoky and sexy too. So let's start.

As always, I want a clean face so do your skincare and let your moisturizer sit a bit before applying primer. When the primer has settled, go ahead and do your foundation base and brows. I pulled my hair back into a bun for this look but feel free to do curls or volume or set your hair or whatever. I just want to make things neat for today.


I contoured my face. Again, my objective for contouring is to not give me a super supermodelish bone structure but slight dimension so I don't flatten out in photos and to give my face an all-over warmth. It actually kinda enhanced my skin color  because I've been swimming a lot again once more since it's been sunny again so I've been less pasty and pale. Yay!


Before I do eye makeup, I dab a good amount of loose powder under my eyes. This is to catch any eyeshadow fallout when I do my eye makeup since I don't want to be having flecks of eyeshadow on my cheeks and the hassle of cleanup. Some use eyeshadow guards which can be bought at makeup supply stores, it's up to you.

Most of my products are from the Lorac Pro Palette, which I purchased at Tupped Boutique.


 It's got a lot of very wearable colors which can make a lot of looks, from day to night. What I like about it is that it has a very good selection of matte colors. This is very pigmented though so when using this, use little product first and then add on as you go.  I also applied eye primer on the lids. This will help my eyeshadow stay put. For this look, I used NARS Pro-Prime Instant Line and Pore Perfector on my eyes.


I start with my brow highlight and I used this color called Cream, which is a nice skintone color that doesn't look too harsh. I like that this makes my browbone pop.


Using a fluffy blending brush (I used MAC 217 here), apply Taupe on the crease creating a contour. Now for the crease contour color to look natural, I want you to blend the life out of it and make it blend seamlessly with the Cream.


Time for the lid color. I used a warm, matte brown color such as Make Up Store eyeshadow in Khaki.


I used a paddle brush to deposit the color on my lids and blended this with my crease color. If I want to deepen my crease, I add a bit more Taupe.

Now just for a tad of shimmer and to make this makeup look less flat, take a clean flat brush and dab it on a satiny, shimmery brown color (not too glittery). I used Pewter here from my Lorac Pro Palette. You can also use a shimmery loose powder eyeshadow.

My lids should look somewhat like this by now.

Smoky is not smoky without eyeliner so I lined my eyes with a nice, smudgy black eyeliner like Urban Decay in Perversion. Don't worry about getting this too perfect because we would be smudging this anyway with a smudger brush or a cotton bud.

To make the black stay, set this with matte black eyeshadow (I used Black from the Lorac Pro Palette).


Blend a bit of Pewter along with the black on the lower lashline.

For more definition, you can use some of the black eyeshadow on the outer V of the eye. You can also add more warmth by blending a bit of reddish brown (such as Garnet) on the crease. Don't put too much!


Curl your lashes and apply mascara. Lashes make a lot of difference in opening up the eyes so go ahead and apply false lashes. But if you prefer just your natural lashes, it's okay too.

For this look, I skipped the falsies and went for a super volumizing mascara such as L'Oreal Miss Manga, which is also waterproof.

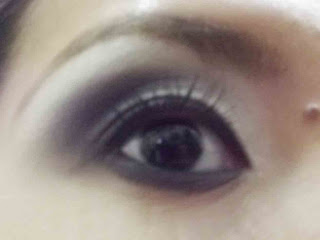
Brush away the loose powder and you have these eyes.


Blush and lipstick are next. Since brown goes with almost anything, feel free to use your favorite blush and lip color. I wanted this look to be more on the warm, coral-y look, so I used a coral blush like Benefit Coralista on my cheeks.


I got my Coralista in this awesome Holiday set I got last Christmas. It's so great I got like six blushes from Benefit in one palette plus a bonus highlight and teensy travel sizes of mascara and eyeliner.


To match my cheeks, I went for a neutral peach-y lip color like MAC Please Me. I use this color a lot at work and my clients really love this color. It's a favorite on most bridal works.


My smoky eyes are done and ready to go.


I admit the look really did take some time since there were a lot of steps, not my usual go-go-go tutorials but it used super basic colors and turned it into an awesome look. If you have all these browns and want to go beyond your sweep of shadow for a special occasion like date night or if you're heading off to an event and you don't have a makeup artist with you, go ahead and try this. It's actually one of my go-to looks if I need to be made up for work and I don't really want to think of what color to use to match my dress or whatever.

Let me know as well if you've tried this look for yourself and where you tried it. Take a photo of yourself and tag me (IG: @bambikitty) so I can see!

Have fun! Stay awesome.


Sunday, March 4, 2012

Tutorial: Angelina Jolie at the Academy Awards-Inspired Eyes + CONTEST!!!!


Do you like the Suesh Smoky Eyes Brush Set? Well, I did and here's a tutorial I made inspired from one of Hollywood's most beautiful faces from the recent Academy Awards - Angelina Jolie. Angie never fails to be absolutely gorgeous no matter what, even with minimal makeup on a boat in Cambodia. At the red carpet, she's gorgeous as ever.


Nevermind the weirdness of the leg in photos (with legs like her, we have no right to complain), Her makeup has the perfect balance of eyes and lips - both are defined with her trademark cat eyes and - boing!!! - red lips. Full-lipped ladies like Angelina can wear red, and how flattering this red is! However, in this tutorial, we focus on the eyes. I did a look inspired from that, a very wearable, subtle smokey eye that you could take from day to night. I used only four colors and four brushes. Most of the colors are in fact, in the neutral side, so anyone can wear this and they go with any lip color you want - red like Angelina, nude, or pastel pink, it's up to you. Just match the lip color with the blush so everything looks tied together.

So let's get started shall we? As you can see, I used certain products for this look, but feel free to use products you're comfy with. I'll just describe the shade for you to know what to use okay? So let's get started. I started with prepping the face first, then defined brows and applied primer for the makeup to stick.


STEPS:

Using a peachy-nude, matte eyeshadow, apply this color from lashline to lid using the large eyeshadow brush.


Contour the crease with matte warm brown eyeshadow using the small eyeshadow brush. You can deposit pigment on the crease with the dome smudge brush and then blend with the small eyeshadow brush for more intensity.


Create a drop shadow by using the same brown eyeshadow on the lower lid with the angled eyeliner brush.


Eyes should look like this: a bit defined, but okay.


Line the eyes with a smoky eye staple: Black pencil eyeliner. I lined the bottom lashline 2/3 of the way and full on the upper lash and slightly extending upward to create a "wing".Set the liner with black eyeshadow using the dome smudge brush for the smoky intense look.


You can blend the upper liner with the smudge brush like so for that intense cat eye look Angie is known for.

For a bit of 3d sparkle, I applied sparkly loose eyeshadow in a neutral peach color on the lids and blended it. I also used this on the tear duct to highlight and a bit on the browbone.


For more prettiness, mascara comes to the rescue. Choose a mascara that instantly pumps lashes into vavoom hotness. False lashes may be added.

And here you go... an eye look that's very easy and pretty using the Suesh Smokey Eyes Brush Set.


I'm feeling generous today and so I'm giving away three Smokey Eyes Brush Sets to three very lucky readers. All they have to do is answer the question below:

How would you create and wear your smoky eye design?

Post the answer to the comments section after this entry with your full name of course! Contest will run this week and it would end March 11. :) Good luck lovies!

Wednesday, November 16, 2011

Smoky Eyes This 2011 Holiday From The Body Shop


Saturday was a busy day for me. I started my day 5 am since I had to do a wedding (which I'll blog about soon). Then, I trooped over to QC for an appointment and back to ortigas, at SM Megamall to be exact to bond with one of the brands that I consider my "coming of age brands", a brand I stuck to from teenage years to adulthood. I'm talking about The Body Shop.

The Body Shop's makeup collection is all about smoke and sparkle, which means smoky eyes, glossy lips, and sparkle. Remember, come December there's gonna be a lot of Christmas parties, events, and it's definitely a must to look good.

I was given a makeover by The Body Shop makeup artist, Roma. She was really nice and had a very light hand with applying makeup. We tried out this season's palette, the 4-Step Smoky Eyes Palette. She even made me choose if I wanted to try the Silver Black palette or the Golden Brown one, I opted for warm smoky eyes so golden brown. She agreed and in fact had that same idea in mind.

Here's Roma's super awesome makeup station that I wanna take home with me.


For foundation, she used The Body Shops' Extra Virgin Minerals for foundation. She had to use the darkest shade mixed with a little drip of medium foundation on me. My my my, someone's been tanning but she got it right. I love that it didn't feel sticky or heavy at all, and it complied with my lack-of-sleep skin making me look supermodel fresh.

And speaking of supermodel, here's how the palette looks like for the supermodel smoky eyes.


It's so pretty! On its own, it looks like a gift waiting for you.


The 4-Step Smoky Eyes palette contains four colors - 3 powder colors and one sparkly cream-to-powder highlighter. It even has a mini applicator brush and pencil since smoky eyes aren't complete without eyeliner.

At the back there's a mini-lesson for you, in case you don't know what to do. When you familiarize yourself with the palette, you may create your own modification and adaptation of the smoky eye.

Swatches!

#1 is warm white base color, which can be applied from lashline to browbone if you want just a sweep of color on lazy office days.
#2 is a dark brown shadow, which can be used to contour the eyes to give depth.
#3 is a chocolate brown shadow, which can be used to further add depth or to define the lower lid or set the eyeliner so it doesn't run.
#4 is a rich brown eye liner (or definer) to be used to tightline and define eyes.

Do you notice that this palette has no presence of black whatsoever? Although black may be omnipresent in smoky eyes, can it be possible to have a purely brown smoky eye?

It looks like it! Roma gave me a warm brown smoky eye that I can take from an afternoon photoshoot to an evening event, depending on how I want it. The look is very wearable. A bride can wear it, a maid of honor can wear it, and well, anyone can wear it in any occasion. I like that the colors are so neutral but they're not so harsh or anything. Yet, my eyes still popped out. What Roma did with the cream-to-powder highlighter was use it as a topper color on my lid, so there's sparkle. It can be used for the browbone too, if you want it to pop.

Just as an ender to smoky eyes are subtle contours and peach glossy lips. The hi-shine lip treatment in coral was topped on a natural peach lip color so all blends in.

With regards to my brows, I was actually surprised that I could carry a darker brown shade than my usual. I like! Another discovery.

The 4-Step Smoky Eyes palette costs Php 1,495. The palette used on me is the Golden Brown Palette, but there's also the Silver and Black palette, which is stronger and more on the cooler side of the spectrum.


Wednesday, August 10, 2011

Purples and Pastels Using Ulta


I feel girly today and I wanted to be pureeety for class today so with a few moments to spare, I efforted to do makeup on myself. I hardly use plums or purples but since my shorts were gold today, I think it's safe, yes. What lips to pair it with? Barbie pink pastel lips!


What's up with you baby hair? They never seem to stay put even with the tightest bun.

Happy with how the colors cooperated. Paint pot of course, my shadows need to hold for an hour (or more) of dancing. I gave the face a break with just mineral makeup though, since I feel my skin breathes more with them when I exercise.


On Face:
  • The Body Shop Tea Tree Oil concealer
  • The Body Shop Shiso White BB cream as an undereye concealer since I'm so tan already
  • Elegant Minerals Rice Powder in Warm Neutral as a primer and finishing powder
  • Ellana foundation in Cinnamon Latte on Face
  • Elegant Minerals Bronzer in Pink Glow as blush.
  • Shu Uemura bronzer on cheeks to contour and to give warmth.

On Eyes
  • MAC paint pot in Painterly
  • Ulta Majesty and Chianti on lids
  • Ulta Pearl on browbone
  • Ulta Majesty on lower lashline
  • Ulta Wisteria lane and Flirty on crease
  • Kryolan black on the outer V (I needed a super matte black for this with no sparklies)
  • Ulta liners in Black and Indigo
  • Stila Smudge pot in Little Black Dress for a winged liner
  • Cover Girl LashBlast Fusion on lashes
On Lips:
MAC Pink Nouveau
MAC lipglass in Icescape

No pictures of pole tricks today as it was most of the time a spinning class so we learned and re-learned our spins and trick-breaked with Superman and Scissor climb to skater. I did the 44 on my bad side without me looking like a monkey though, and I managed to try to land on a split. I guess purple can be lucky for me. :)


Monday, July 4, 2011

Katy Perry's Firework-Inspired Tutorial


Happy Fourth of July everyone! Although it isn't a Philippine holiday, my friends (and readers) in the US celebrate it, so extended (virtual) fireworks here too!!!!! Today, I was inspired to make a tutorial, from a very festive song that's very much apt for the date. I chose to make a tutorial inspired by Katy Perry's look in her music video Firework.


I watched the video a lot of times so I could have an idea on how the makeup is like (not to mention how I love the song. It's currently my ringtone ) and downloaded the stills above so I could check my progress during my practice sessions. The look is very easy, actually, and for my version, I try to use as little color as possible, but I ended up with four colors. The four-color version is the easy way of doing the makeup. It's achievable to do the eye makeup with only two colors. The extra two are just "cheats". If you get better and master the art of blending, it's easy to accomplish this with only two colors.

Anyway, I started off with the easy part, which is to create an even canvas with foundation, concealer, powder, and contour. Katy Perry has a very flawless complexion and we'd want to mimic that. After setting everything and giving the face dimension, I defined my brows. Katy has such defined brows, but since it was dark on the video, I wanted to make the look more wearable by using taupe or brown eyebrow powder to define brows. If you have an arch, make sure it stands out like Katy's but not too over-the-top. In my case, I defined the tail of my brows with pencil, so there's more shape.

To make the eyeshadow stay put and glide easier, I applied eyeshadow base. I used Laura Mercier Eye Base in Eyebright and blended this from lashline to browbones.

Now it's time for the base color. I chose a shiny color like MAC Nylon, since that really really pops against matte black. I applied Nylon from lashline to browbone, basically the whole upper eye area.

By the way, don't forget to apply some loose powder on the undereye area to capture any eyeshadow fallout that might occur.

Next up is a cheat technique to define the crease. Using a silver-gray color (like MAC Arctic Gray), sweep this up in a windshield-wiper like motion on the crease of the eye, from out to in, to get that hollow slightly defined before going to deep black. To contour the eye, I used a fluffy round brush like Bobbi Brown Eye contour brush which gets the color deposited and blended easily.

The tricky part comes next, is where the black eyeshadow for depth comes in. The easy way to get this done is by the deposit-and-blend technique. We deposit the pigment first on the eye with a stiff brush and then, with a fluffy brush, blend this so we get a nice and smooth transition. Gets? Okay, so using a narrow and stiff brush (I like using a pencil brush or a MAC 219 brush), get some matte black eyeshadow powder (I used Kryolan black) and apply this on the outer corner of the eye carefully, just dabbing on the area you want it concentrated.

Remember to apply only little product at first and add on as you go. As you go by this step, you'll see why I wanted to apply loose powder on the undereye. It captures the little black speckles as you go along. So after that, your eye has to look something like this:

It kinda looks clownish and weird though, some might think panda effect. But wait, we're not yet done. To get that flawless look, get a nice fluffy eyeshadow brush (my weapon of choice is MAC 217) and.

BLEND LIKE YOUR LIFE DEPENDED ON IT!!!!! Blend till you get a smooth transition of colors. You could adjust as you go along, adding more black and blending, until you get a really nice transition of colors. You could adjust by adding more nylon too, if the black got too far. Just make sure that the blending's all nice and seamless. By the end of that, the eye should look something like this:

As you go along, you'll find out that you'll get better, and you can survive with just Nylon and black.

Anyway, here's another trick if you want it less dull. The secret is wedging in a bit of green on the outer corner and blending it well, just to create dimension so the black doesn't look so flat and dull. I used The Body Shop color in #43, a nice and sparkly dark deep green color, and applied it in the area shown, and then I blended it too, so it doesn't look like I schplunked some green that it looks out of place. That's another cheat technique.


To further smoke up the eye, line eyes with a soft and smudgy black eyeliner, like this Kajal eyeliner in black. since kajal eyeliners tend to be super smudgy, insure that it stays put with black eyeshadow powder. Clean up by dusting off loose powder.

So lashes do not get lost with all that makeup, Curl them and apply a mega-pumping mascara like Cover Girl LashBlast fusion. Falsies are encouraged, but you could do without them if you wish.

Eye progress so far:

The rest is easy. Choose a candy pink blush with some sheer slight shimmer and sweep this on the apples of your cheeks. I used The Body Shop in Vibrant Rose, a nice sweet pink color that looks like a healthy flush on the cheeks.

For lip color, I wanted it to match the cheeks. You could go by a sheer plum color or if you want, a nice magenta color like MAC Spitfire would do. Just don't make it too matte.

So here's my Firework-inspired look:


So here's my Firew0rk-inspired makeup tutorial for you girls. with a look like this, it's best when worn with confidence. Don't be shy with that smoky eye. Break off the mascara and gloss habit and try a look like this. Have fun!