Friday, October 31, 2008

With the last hour of October left

Availed Nail To Toe's October promo of getting 10% off on your manicure when you use PINK polish in honor of breast cancer month. :-) at the last day of October.


I love that pink! I've got karpintera nails due to years of being glued to the keyboard plus playing the piano and lots of needlework, but I love how they clean it without injuring my nails. They also use high-quality imported nail polish, and they're carefully selected to make sure they don't chip minutes after use.

Another new thing they've added to their routine is a nail dryer, so no need to super wait ages for the nails to completely dry. My nails dried relatively fast and whereas when doing DIY or own manis, I used to wait ages just to be able to fish out money, This one only takes a few minutes.

Whether it may be pink or red (my classic fave) or the spicy, dark shades of rhum, wine, plum, etc, I've been a fan of Nail to Toe salon ever since I got my back massage. A good thing I've also seen is how their techniques are refreshed new stuff and trends are brought out. Definitely international quality just a few steps away from my house.

Actually, this is one place that makes me not leave Las PiƱas, even though it's super far from the rest of the world!

My Good-Girl Rewards

My absence in the blogosphere is not due to me not wanting to blog... I've been preoccupied lately with shoots/clients. Since I've been working too hard and doing great, I've decided to reward myself the other day with a couple-a new things.


Shoes and bags are my weaknesses. My feet being picky and humongous need comfortable yet stylish shoes. Events have seen too much of my 8-year-old heels that still work and I intend to keep them, yet I need another pair for other functions. A pair of conservative black pumps to go with outrageous stockings or fishnets...

I was searching in other shops but unfortunately, they didn't have my size, the style was too painful, or well, it wasn't just my type. However, when I went to The Ramp, I spotted two pairs of pumps that got my fancy and both had my size. One was plain black that was really comfortable. One was black with a bit of red detail. I went for the latter since I don't want my shoes to be too boring.


Tadaaa.... new shoes. They're more comfortable than you think... and I haven't broken them in yet. It is kinda loose, but corks would fix that.


Details, details...


(Php 900 at Ilaya Couture)

Yes. Im a size 9. My feet are gigantic. The heel is conservative enough, just 2-1/2 inches. They go well with pants or a nice shift dress, ne? I really like black shoes because they're so classic. I doubt this will wear off trends anytime soon. I stick to classic pieces and just accent them a little for pizzazz.


If you look at the picture, you'd see my new bag peaking out. My fascination for anything reptilian has been an interesting trivia to many, since I seem so girly. Not that I want to have a pet snake. I've found snakes just beautiful and mysterious. I've been fascinated with them so much I had a reptilian-inspired photoshoot. I spotted this bag weeks ago at Goldcrest and I've been wanting to buy it. I've actually been eyeing for a red version but this bag couldn't just get out of my head. I've been choosing this or a [faux] croc skin red bag but I think this baby won the verdict.


If I can't have my ever-so-coveted Speedy yet, this would do. The bag's roomy enough to fit all my tambak of stuff. Plus since it's an un-branded bag that's not an dupe of any designer label, I think it's pretty safe to take with me abroad. :) Oooooohhhh I just loved it after I bought it, I immediately used it.

The retail price? Php400 (haggled)

Okay, so I might have overspent that day, but hey, it's not everyday that I get to have beauties like these.... Besides, I've worked really hard and it's time I get these. :)

Tuesday, October 28, 2008

Light as a Feather, Smooth as Silk

Part of the goodies Erika and I got at the Shu Uemura event was not only the food and drinks (heeheehee.... ) but also the goodie bag containing loads of Shu Uemura star products. Aside from being glad that I got a hefty supply of my addiction cleansing oil (I REALLY REALLY REALLY LOVE IT), which I have perpetually blogged about, I'm glad on getting my hands on another star product, the Shu Uemura UV Underbase:


Retail price: Php 2,000 or US$32.00 at shuuemura-usa.com

The Shu Uemura UV Underbase actually is applied before makeup being

" A weightless mousse makeup base that helps to even out skintone and texture, reduce redness and minimize the appearance of pores. Use before makeup application to prepare the face for flawless makeup.

  • Unique, lightweight mousse texture for even application and coverage
  • Hamamelis extract helps to tighten pores and make skin surface smoother
  • Can be worn alone or creates the perfect canvas for foundation application
  • SPF protection against harmful UV rays "
[text credits]

It actually has two variants, #01 having a yellow undertone and #02 having a pink undertone. Both do not drastically change the complexion although according to those on counter, they state that the pinkish one creates a soft "glow" especially if the wearer is attending a wedding, a sweet 16, or is currently sporting a blunt cut. I prefer the #01, since I have yellow-toned skin, being Asian.

So what happens is actually I shake the bottle and dispense a small amount of product on my (clean) hands)


See? It's a mousse formulation. It goes on pretty light on my face and it got absorbed easily. Since sunblock is usually associated with sticky, greasy, and yucky feel, this one did not. It even smells pretty good. I applied this before I applied foundation and concealer. I don't see a drastic change though, but I could see that makeup goes on much easier plus I don't need to conceal that much since minor imperfections have already been evened out. Plus, it wasn't your usual sticky primer.

Will I repurchase? Definitely! Although the price is pretty steep, a good canvas is pretty much worth it. I use this for special events though, and I use little amount since I don't like piling stuff on my face. On counter, this is applied with a sponge (make sure to squeeze the sponge so the sponge doesn't "eat" up the product). For personal application, you can go ahead and use your fingers.

Oh, and during long days, this can be used to retouch/change makeup since it "melts" whatever dirt and yucky stuff that have clumped up on your face. Just apply this and then spritz with Depsea water (a Shu Uemura technique) and then go ahead and proceed with the makeup!

Thursday, October 23, 2008

Makeupbybambi on Fashion Week

Want to know how I did my Fashion Week look? Then watch this tutorial. I was running late already and as soon as I threw on my all-black outfit, I clipped my hair up and threw on my shawl. With barely a few minutes left... I had to put on foolproof makeup that would still make me look good....


Hence... my 5-minute smoky eye I learned from Sandy Gold in her Youtube Video.

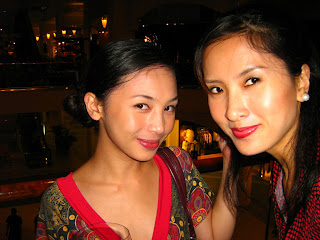
me with Chinz and Dennis. Oh and that fantastic neckpiece I'm wearing is a Dennis Celestial creation. Fab innit?

Okay, so I went for subdued lips and put a bit of drama on the eyes. It's fairly simple. In fact, what I did here is the foundation and bronzer at home and the eye makeup on installment. I completed the makeup in the cab when i blended the shadow and put on mascara and lipstick.

Anyway, here's how the ten-minute (or less) smoky eye goes after foundation and powder:
1. Tightline eyes with dark brown eyeliner and smudge it to get in between the lashlines.
2. Use a soft black eyeliner to thickly line the upper lashline and smudge this up to the crease. Line also the outer corners of the eyes with black liner and smudge.
3. Now here's the fun part: Apply brown eyeshadow using an eyeshadow brush on the lid. Sometimes, I go have fun and add washes of greens or purples depending on my mood.
4. Make the eyes dramatic by applying black eyeshadow on the outer corner and sweeping this up to the crease. Blend well.
5. Re-line eyes with black pencil. Set eyeliner with matte black shadow to prevent smudging
6. Highlight the browbone with matte or satin finish highlight color.
7. Curl lashes and be generous with mascara. Define brows.
8. Sweep on Bronzer and nude lipstick.

These 8 steps are fairly easy to do. Just keep practicing and you'll get it. Remember, focus on either lips or eyes, not both. :)

Wednesday, October 22, 2008

Wet and White


[credits in the photo]

another folio pride. Click here for more. It looks like a cover of an international magazine.

This is how guy makeup should look like - clean, natural, and if ever, there will just be a sort of glow. I personally want makeup not to look made up. A technique to learn is just to apply a sheer amount of foundation and blend well. Don't lay on too much powder. It's also helpful to start with super clean skin, which I did. :) Another proof to males that guy makeup need not look too cakey.

Shu Uemura Store... officially in Manila

After I came home from work last night, I checked my pro email and I got an invite from Michelle Fernandez of Shu Uemura inviting me to the formal launch of their boutique on October 20, 2008. Since I'm such a Shu fan, I immediately said yes. Attire was black, red, and white. Oh, and I thought I dont have kasama but I thought maybe I'll meet a few new friends along the way. It was a sudden surprise that guess what... Erika was invited as well to this event! So my food-tripping, Krispy Kreme loving, and ever so kulit model friend and I had a whole night of makeup, gorgeous people, and of course, FOOD in store!


That wing of Rockwell was filled with cocktail tables and a sea of gorgeous people in red, white, and black were there sipping cocktails and dining on Japanese food (yumm!). Models were there to display creations by the talented panel of Shu Uemura makeup artists


I had the chance to say hi to a few familiar friends as well. I spotted makeup artists, regular Shu clients I meet in workshops, and also a familiar friend...


EJ Mallorca! EJ has been in my blogs and I've interviewed him in several of my YT videos. He's gonna be based in this new store and I sure will visit Rockwell very often! He's such a sweetie. He's also one of the few makeup artists who can do makeup on me with full reign. He always perfects my face and knows my features well. He could even identify my Face Architect shade in a snap.

After cocktails, A fashion show was held where models sashayed the stage and then come Shu Uemura makeup artists to do quick makeovers on them. After which guests were asked to go to the Shu Uemura Boutique, covered behind a black velvet curtain.


And then....


Ladies and Gentlemen, the very first Shu Uemura Boutique is officially open! It's no joke... It's here!

I'll let the pictures do the talking....since I am just like there sighing all throughout...


Looking at these pictures definitely make me feel like a little girl eternally trapped in a candy stop/toy store. I'm sure Mr. Shu Uemura is mighty proud himself of this accomplishment here in Manila. I love Shu very very much!

I was also able to spot a few friends and fellow artists Dianne, photographer Niccolo Cosme, and Ms. Xeng Zulueta, all I paused for quick chats. I also saw Ms. Rachel Lobangco and her daughter, looking fab and oh-so-cute in their matching ensemble amidst a sea of reds, blacks, and whites.


I just had to take a pic of them. They are just a cute mom-and-daughter tandem!

Oh... and here's a lovely day-ender


Sigh.... definitely I have to say... "I lab Shu!!!" Heeheehee
So anyone going to Rockwell? Drop by the first-ever Shu Uemura Boutique here in Manila!

Monday, October 20, 2008

Smoky Smoky

Just last week, Dennis asked me to HMuA for his shoot. When I saw the crew lineup, it featured really talented artists so I was twice as nervous. I hardly had any sleep the day before since I was really nervous. First, I met up with my friend, Cyril, since my grad gift to him was to be his personal makeup artist for his graduation picture. Picture to follow as soon as I get the high res copy.


Anyway, after which I met up with the model and we both went to the location for our shoot. Guess what? My smoky eyes rocked. I guess the practice was worth it! :) I did a very dark smoky eye on both of them. On the male model, I used browns and charcoals then darkened it at the contours with black (all makeup by Kryolan). On the female model, I tightlined her eyes then lined it thickly with Indian kohl pencil and did some smudging. I played with grays and blacks to get the dimension the stylist wanted and kept everything in a matte finish.


So here's the outcome:


Models: Cielo and Chinz
Photographer: Filbert Kung
Makeup: Bambi de la Cruz
Stylist and Accessories by: Dennis Celestial

I kept the eyebrows really light to focus everything on the eyes. Lips are a nude matte shade, almost skin tone. I had fun in this shoot. Not only was the team phenomenal, they are a joy to work with!

For those asking me tips on how to do smoky eyes, here's what I would suggest:
1. Use a base. Smoky eyes are highly pigmented and shadows need something to cling on to.
2. Highlight the browbone. It would look like a black eye if you don't.
3. When using eyeliner, make sure to powder over it with matte black eyeshadow.
4. White or skintone eyeliner on the waterlines can make eyes look bigger.
5. Blend. make sure both eyes are evenly symmetrical.
6. Smoky eyes start dark at the lashline then fade to almost nothing on the browbone. Make sure there's a gradation.
7. Get liner in between the lashlines.
8. Balance smoky eyes with lots of mascara (falsies too, if you want as your lashes could get lost with all that makeup), and nude lips. Keep blush just a natural flush.
9. Experiment with different colors to suit your mood. :)
10. Remember to wash everything off at the end of the day. :)

Waterproof Love

Since most of my work last week has been involving water and beach shoots lately so the quest for water-resistant makeup has been my adventure the past few days (also i've been bombarded with shoots and all). Actually, I'd like to zero down two in my list that I've discovered so far. Waterproof makeup (especially the eye makeup) is also important not just for heavy-duty shoots but also weddings where a lot of crying is involved and sometimes every day life, when all's too sweaty.
However, since waterproof makeup can be expensive, I can zero in two of my favorite waterproof variants:

Here's my ever-so-fabulous mascara favorite:

FASIO Mascara (any variant) (Php395.00 at Rustans)

It's practically waterproof, smudge proof, cry proof, sweatproof, and everything proof. I think it's almost makeup remover proof, you practically need to soak it in makeup remover to get it out. I used that for my beach photoshoot and the models were surprised they didn't end up looking like a raccoon. :) Plus, if you don't remove it properly, you would have more for the next day. :)


For eyeshadow, I'm loving In2It waterproof colors. Plus, they go on sale!


That's my eye and I've already road-tested it by summerging my entire face in water. As you could see, the makeup is still intact. The technique though is to layer, layer, and layer. You can use a sponge tip applicator for intense application. That's what I did since I did an ultimate road test.


The good thing about in2it is that they have a variety of colors and the price isn't that high. I havent tried using a sealant yet but this looks like a good alternative for now. :) You have my claim on these products as I have subjected these babies into violent road-testing. Although that's a lot of layers, just to make sure. :)


Sunday, October 12, 2008

Sneak Peek


I gotta model for my good friend, graphic artist and photographer Apy Arevalo for her concept shoot. She did two layouts for me, one being Royalty and another well... let's find out


Here's the royalty shoot makeup:


I'm loving the big hair. The hairstylist tortured it with maximum teasing and practically finished a can of hairspray to get it that high! Supposedly it's Elizabethan. Not complaining.


Second shoot
Story behind this was that Apy told me to wear this pretty pink gown tas with a shawl. Then Tippy suggested the idea of wrapping the shawl around my head like Erykah Badhu (tama ba spelling?). Then I was thinking - why not Valentina? since I'm such a fan of anything reptilian... dedicate na lang shoot to something like this. :D I really had a fun time being shot.
By the way... my makeup... was done by myself in the cab. I already put on my foundation and contours and powder/eyebrow at home then took the bus to buendia and took a cab to the studio then continued doing my makeup in the cab so by the time I got to the studio, all i had to do was stick on falsies, powder up, and I'm good to go. :)
I really had fun in the shoot! Will post pix soon!

Tuesday, October 7, 2008

My Green-and-Lilac EOTD using my Baxi Shadows

Just a few weeks ago, I saw a pallete of Baxi eyeshadows and 2 blushers and after finding out how super pigmented they are got myself one (At Php100.00 a pop. ha!)

Since I'll be heading off for a shoot in a few minutes, I thought I'd share first my EOTD using my super inexpensive and super colorful Baxi shadows.


So here's the guide:


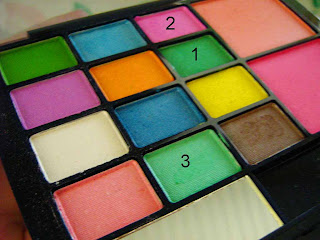
Basically I just used colors marked 1, 2, and 3. For the others, though, I did incorporate a bit of other makeup. :)


So here's how to do it:

I applied concealer on areas that need evening out and buffed mineral foundation on my face and set it with Setting Powder.
Groomed and defined brows and tightlined my eyes with dark brown eyeliner.
Then, I lined my upper eyelids with black kohl pencil and smudged this up to the crease for a smoky effect and also to act as a base (im going for colorful smokey eyes here)
On inner upper lid, I dabbed color #1 and blended this through halfway.
On inner lower lid is color #3, and i blended this halfway.
On outer upper lid, I dabbed in color #2. I blended where the two colors meet (a defined boundary is yucky) and also up towards the crease. I blended this so it does not look like a stroke of color. I also swept color #2 on the lower outer lashline to act as a drop shadow.
Finally, I highlighted the ball of the lid with a shimmery green loose powder eyeshadow (you can use your favorite MAC pigment/Careline loose powder shadow/MMU eyeshdaow) and BLEND well.
Then, for more definition, I lined my eyes with black pencil liner and smudged to soften. Curl lashes and add lots of mascara.
No blush here, since I made my eyes take center stage. I added a frosty glittery pink lipstick to go with the whole scheme.
Gotta go now! Hope you like this EOTD!

Monday, October 6, 2008

Olay Regenerist Line: Own It First!

With Olay Regenerist's arrival here in Manila quick approaching, to those who can't wait, here's a treat:

Olay Regenerist will have a pre-sale so you could own it first before it officially arrives!

On October 18, 2008, Selected Watsons at SM Department stores will be carrying Olay Regenerist items to purchase. There will only be limited stocks available so sign up for the priority list at:

http://www.olay.com.ph

or

http://www.femalenetwork.com

or check with the Olay Beauty Consultants in the participating Watsons branches at

SM Makati
SM Megamall
SM Mall of Asia
SM North Edsa
SM Cebu

Got your interest? Want my say on the product? Click here.

So what are you waiting for? Sign up now!

My Skin Care Ritual


[image credits]

Lately I haven't been wearing much makeup than I used to since I have been working behind lenses plus I get really early call-times. heeheeheee. Anyway, so of course, inasmuch as I love makeup, I always take care of what's underneath that, and that's my skin. Okay, don't get me wrong. I'm not all flawless all the time, 24/7. I do have my days of oiliness, haggard skin, and also my breakouts, but that's due to lack of sleep, abuse of skincare, and too much junk food (I can't help it... I love french fries and potato chips and wasabe popcorn and ice cream and boxes of chocolates!).

One tip I learned too, was the fact how my skin dramatically improved when I finally quit my smoking habit. Smoking dried up my skin before and I really subsisted on moisturizer and had to pile on that makeup. I also keep myself hydrated with lots of fluids and of course, plenty of healthy food. I guess they had it right when they told me that taking care of the skin starts from within.


(Me without makeup. Photo by Lauren Dalao)

So here, I'm writing to finally share my skin care ritual. It's not as complicated as you might think...

Morning:
After or during I hit the shower, I wash my face with facial wash. Soap can be too drying on my face and it could strip my face of its natural moisture. Depending on the season, my preference for facial wash could change. On hot days, I prefer gel-type or liquid-types that can strip away oil and dirt and yucky stuff. On cold days, I might need the extra help of a cream cleanser. If I have time, I do a final rinse of cold water to close the pores.

I like toners because they sort of seal the face and prep it up for moisturizer. I whisk this on my face and throat and let it evaporate first, then I put moisturizer with SPF. Yep! We all need SPF!
Eye cream has been an added step after I became conscious of my skin around the eyes. I didn't know how delicate they were and how they need a lot of TLC. So there.

Lip butter is next since I'm such a fan of matte lipsticks. Since they tend to be a bit harsh and drying, I slather on lip butter or lip balm then wait 5 minutes before I proceed with my makeup (if I do)

Evening:

After a day of shoots, shopping, or just lounging around, I need to clean my face of all that dirt and germs. I use cleansing oil to remove my makeup. Cleansing oils have been my best friend after I discovered how potent they are in removing even the most waterproof mascara. If I have time, I go old-fashioned with cold cream or cleansing milk.

My face needs a wash and so it gets washed... I want a really really clean face before I go to bed. Toner as usual to seal in the pores and I put on an intense eye cream made for night.

Lastly, I apply firming night cream on my face and neck and massage it well so that it gets easily absorbed into the skin. After which, lip balm comes next since I want my lips soft and smooth when I wake up in the morning.

Extras:
Sometimes i like to pamper myself. Twice a week, I use exfoliants to rid myself of dull skin. Plus, when I feel like it, I use a super hydrating facial mask to give my skin its much-needed vitamins. I don't overdo this though, as this could traumatize my skin.

Whatever skin ritual you may have, aside from a healthy lifestyle, always follow these cardinal rules:
1. Never leave the house without SPF!
2. Never go to bed with dirty skin!
3. Never prick your pimples!

Anyone care to share their skin rituals?

HAPPY HAPPY BIRTHDAY

To the most well-loved, and one of the most talented photographers here in Multiply

STANLEY ONG!

Have a Happy Happy Happy Birthday!

Here's to more shoots, more fun, more kakulitan, more success, more love, more fans, and more happiness!

Mahal ka namin Stan forever and ever and ever! NAAAAAKKKSSSSS!!!!!!!!!!!!!!!!!!!

From your ever-so-loyal fans at STANLEYDDICTION!

Burger! Burger! Burger!!!! :D

Friday, October 3, 2008

Our Neutrogena Contest Winner!

Winner for our contest:

"what keeps me energized all day is a better outlook in life. maybe it's just me but as an individual- a better individual- a nice outlook in life is a great help. some looks forward for inspiration and some for achieving their goals. others could answer this question by saying their rituals and routines, but mine is different. well, different strokes for different folks:-)"

This is none other than JC Glifonea!

Congrats JC! will send you package by next week! :) I have your contact details. :D

Photography Debut

With as far as macros are concerned (and my product shots for blogging), I need to find my way around a camera (even if it may be a trusty P&S). In my photoshoot last Wednesday, despite the rain and Metro Manila being declared as Signal #2, we still continued on our photoshoot at Rouge Studio, I was watching the shoot and trying to do a bit of coaching on the model. The owner of the studio, G, seeing that I wanted to take a few shots, lent me his camera (a lovely Canon 40D) and encouraged me to take some shoots.

Needless to say, this is my debut in photography - or sort of. He already pre-adjusted the camera and the lights. All I had to do was angle and click:
Here's my model, Amor. Don't you think she reminds you of Nik Pace from ANTM Cycle 5?


Amor is another trooper. She came all the way from Pampanga (commuting with all her luggage) for this shoot. I was worried that the shoot would be canceled due to the rains but the whole team braved the shoot.
Another bonus was that Dennis and Stanley also passed by. Sweetest people on earth! The shoot was so much fun. The studio is turning to be another favorite of mine due to its relaxed atmosphere. We sure enjoyed a lot and we didn't feel any pressure. In this layout, I gave Amor smoky eyes but with a twist. For the lid color, I used cream eyeshadow in a gray color and packed on glitter to make it look like glitter shadow and encircled the crease with a matte black color. I kept the lips nude to focus on her eyes. Lucky Amor already has curled and thick lashes.
We finished at 8 or 9 pm but it sure was worth it!

Wednesday, October 1, 2008

The Body Shop Launches Nature's Minerals

The Body Shop takes makeup and friendliness to the next level by launching their own mineral makeup line, limited edition of course!

While I was at MoA for some retail therapy, I passed by the Body Shop and saw their display. Luckily, Toni was there and invited me to have a look at the products. I must say that a lot of big makeup companies are going to the mineral makeup craze nowadays. I also have mineral makeup on my makeup kits, and I use the mineral makeup foundation as loose powder in some of my shoots. I just apply little though, as this can be heavy if applied too much. For everyday, though, sometimes I go with just mineral foundation. :)

Anyway, so I zeroed in on the brushes....


My camera angle doesn't show it but the smaller brush is for the blush brush and the bigger one is for foundation. Like all TBS products, these brushes are all made of synthetic hair. I asked about the difference between that brush and my current kabuki brush, also by The Body Shop, which I got for my birthday. These brushes, though, are more compact and specified for the face whereas my kabuki brush can be used for both face and body.

Texture wise, this brush is so soft. No prick. No hurt. No owie, even with the slightest pressure. However, I still apply my makeup with the lightest touch!


The foundations here...


are in loose form and here's what The Body Shop says about them:


"A premium, up-to-the-minute loose powder foundation, made from minerals. Long-lasting, blendable powders act like a veil to help defend the skin against sun damage with SPF 25. Ultra light powders apply evenly and blend easily for a radiant, natural-looking complexion. Colour builds easily to provide an adjustable light to medium coverage. "
[text credits]


So what you do is just dispense a slight amount on the cover, swirl the kabuki brush, tap the excess off, then lightly buff on face and blend. You can add another layer if you feel you need another coverage. I like the glow actually. Since I had some redness problems, they applied concealer first to even out my skintone and then proceeded to buff the mineral foundation. It actually didn't feel heavy on my face, another thing I'm particular with my makeup.


All mineral makeup is in loose form and come with specialized brushes as well. I particularly like the glow the bronzers and blush gave me, although it can be hard to control since it's loose so better just apply little first. And also, as we all know, mineral makeup can be very intense. Eyeshadows are just as pigmented as well, and they are also in loose form. I actually bought myself an eyeshadow brush (all brushes and mineral makeup are Php100.00 off and if you buy a set, you get it at Php300.00 off. Each purchase of Nature's Minerals gives you a free mascara. Discount+freebie!)


I actually like the effect it gave me (pic is actually repeat performance from my food blog post). Natural with just definition on the eyes and glow on the cheeks. Lips? That's just lip butter!


Natural natural natural. :)