Showing posts with label eye makeup. Show all posts

Monday, January 23, 2017

Tutorial: Ombre Cat Eyeliner

I've been experimenting with eyeliner techniques and colors, especially since colored eyeliners are quite becoming more "in." I still love my black and browns, which have been staples in my makeup bag, but sometimes, it's nice to have a pop of color once in a while. On its own, it's a statement without eyeshadow, giving you a nice, edgy look. I usually use this technique when I need to go to an event after a workout session and I don't really want to bring brushes and all.

In this tutorial, I have a two-toned ombre cat eyeliner using the classic black and plum eyeliner. The cat eye starts off first as plum then wings out to black in the end. It's subdued enough to be worn in weddings or formal events yet it's got an interesting twist to it. You can use the eyeliner technique alone without eyeshadow but if you want to use eyeshadow or a full face of makeup either you feel inspired to put on makeup today or you just want to feel better, check this tutorial out. The warm gold scheme of the eye color contrasts well with the plum eyeliner so the plum stands out because otherwise, nonsense. Maybe you can't use this for your passport photo, but for a wedding, maybe.

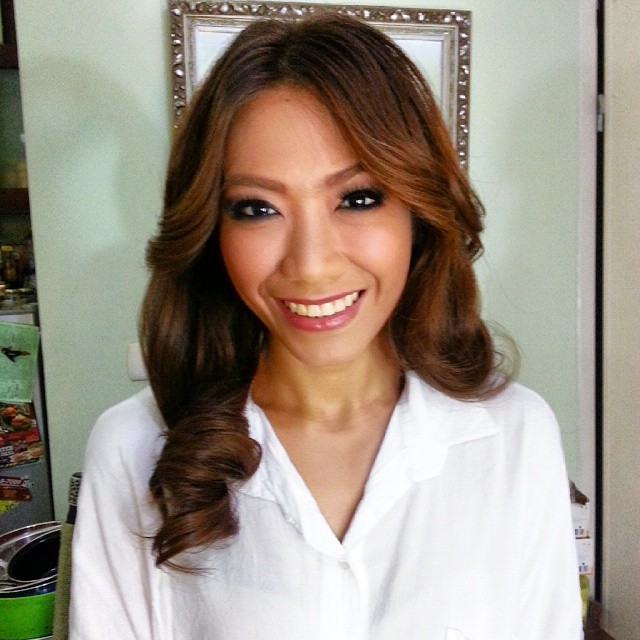
Plum gel liner adds a different twist to an otherwise classic look


What You Need:
(I indicated the brands I used in the parenthesis. Feel free to use other brands of your own preference)

  • Eyeshadows (Urban Decay Naked Smokey Palette)
  • Black Eyeliner (L'Oreal Superliner Superstar)
  • Purple/Plum eyeliner (MAC Fluidline in Looking Good)
  • Black Pencil Eyeliner (Urban Decay24/7 Glide-On Eye Pencil in Perversion)
  • Charcoal Pencil Eyeliner (Eye of Hours eye pencil in Charcoal Obsidian)
  • Eyeshadow primer (NYX Eyeshadow base)


(Note: I did already my base, brows, contour, cheek color, and lip color here, so let's go straight to shadow)


Step 1: Apply eyeshadow primer from lashline to browbone.


Step 2: Apply a light contour color on the crease (UD Combust)


Step 3: Dab a shimmery golden color on the lid (UD Dirtysweet)


Step 4: On the outer 1/3 of the eye, apply a darker color with the same shimmery finish as the lid color (UD Radar)


Step 5: Smoke things out by applying a dark gray-black or black color on the outer V of the eye (UD Black Market)


Step 6: Line the bottom liner with charcoal pencil and set this with the same color you used on the outer V. Highlight the browbone and inner corners of the eyes with a bone-colored color (UD Thirteen). Blend the life out of the edges for nice, even transitions.


 Step 7: Tightline the upper lashlines with black eye pencil. Blend and smudge to slightly "smoke" it out.


Step 8: Use a purple eyeliner to line the top lashline, stopping until just before the outer corner.


Step 9: Go over where you ended the purple eyeliner with the black eyeliner and continue on lining the eyes and "flick" out the wing."


Step 10: Your eye liner should look like this: Starting off as purple, then ending with a black wing tip. If you want, lightly blend the transition between the purple and the black so you get a nice, blended ombre effect.

Finish off your look with some mascara on curled lashes. Apply falsies if desired. Finished!


Take this look to your next event or party. It's a way to introduce colored liners to your makeup kit, accompanying them with a basic black or charcoal and an otherwise neutral eye. The wing tip does take a lot of challenge getting even and I really took a long time there. If you have any wing tip tricks  to get both sides even, do leave them in the comments below.  Enjoy this new look for the new year!


Store Directory:

Eye Of Horus
Available at Purbeauty, Landmark, and SM Department stores; available at glamourbox.com, and beautymnl.com; facebook.com/eyeofhorusph; instagram.com/eyeofhorusph

L'Oreal Paris
Available at all leading groceries, beauty hubs, and department stores nationwide; lorealparis.com; lorealparisexclusif.ph; facebook.com/LOrealParisPhilippines

NYX
available at leading department stores; nyxcosmetics.com; facebook.com/nyxcosmeticsph

MAC
click here for a complete list of stores; maccosmetics.com; rustans-thebeautysource.com; maccosmetics.com.ph; facebook.com/MACcosmetics

Urban Decay
urbandecay.com; facebook.com/urbandecayglobal; instagram.com/urbandecaycosmetics

Sunday, June 28, 2015

Lasting Makeup Over or Underwater with Make Up For Ever Aqua Collection

It's Stellar season once again since it's summer and while I'm not dancing this year as I did two years ago, I'm doing backstage work this time since I'll be doing hair and makeup with my pole sisters and brother. Yesterday, we just had our photoshoot and I was at the studio the whole day transforming students to comic book villains, sorcerers, and sweaty, sexy jazz dancers. Even though it's a photoshoot and the makeup would need to last up until the last pose, I took this as our "trial makeup" for the actual day.

As dancers need makeup that not only would be seen way up to the back of the theater, they also need to last long. A few weeks ago, I was invited to the launch of Make Up For Ever's Aqua Collection. The Aqua Collection is supposed to be made for synchronized swimmers who need to look pretty with their makeup not melting and turning the pool to a rainbow of pigments. If it could last swimming with no retouch, it can last  a sweaty pole dance number.


The Aquamatic glide-on eyeshadow glides on like a pencil and blends well like an eyeshadow. It can be used as an eyeliner for a quick look on the go or blended like a wash of color. It's got a wide range of colors from the natural and wearable ones like blacks and browns to metallics and brights. Use the brights and metallics not just on the face but to create festive body art.

Aquamatic Glide-On Eyeshadow in Matte Black, Php 1,350
The black one (Matte Black) is your basic black matte for smoky eyes or cat eye if you don't want to bothered with a lot of control liquid liner needs. Yesterday, I used it to make question mark details and lasting cut-creases on my makeup for Riddler and Two-Face. I blended it as soon as I applied it if I am doing the cut-crease or the dark-eye detail of Harvey Dent's evil side.

Lanie (left) as the Riddler and Angela (right) as Two-Face. I used black to create the question mark details and the dark makeup detail. 


Just last week, I did makeup for my yoga teacher Nikki since she would be attending an event at Resort's World. I used Noir Mat as a smoky eyeliner for the eye makeup to stay put.


Brights like purple and blue can be used as a statement eyeliner too if you are tired and bored from the usual blacks and browns


 Just in case you want a pointier tip for your glide-on eyeshadow, the bottom end twists off for a built-in mini sharpener. Just be careful in using it so you don't break off the tip. How waterproof is this? I wore this as an eyeliner without setting it with powder, taught a yoga class at noon when it's really hot and I even sweat buckets,  took a shower, and I still have my liner on with no smearing at all. You would need makeup remover to remove this. Make Up For Ever suggests Sens'Eyes Waterproof Sensitive Eye Cleanser to remove this easily.


Compliment your colorful eyes with sweet kisses of apricot and cotton candy with the Aqua Rouge liquid lip color. The colored product is topped with a sealing topcoat (clear formula, like a clear lipgloss) to seal the color without the stick or crack so your color lasts the whole day.  


The Apricot color is my personal favorite for nude lip colors. I'll be using this in a prenup shoot later. Php 1,550 at Make Up For Ever stores.

Dancers, make up artists, theater performers, and even makeup afficionados who would love their makeup fix without the smear wherever they go would love this because of its durability and user-friendliness. Have the basic black or dark brown with you for subtle eye definition and probably choose your favorite color pop if you want to buy. If this product can withstand synchronized swimming and a yoga class in the hot humid weather we have, it must be awesome.

Like Make Up For Ever Philippines in Facebook for more updates or follow them in Instagram,

Monday, July 14, 2014

Flutter and Frame with L'Oreal False Lash Butterfly Mascara

For lazy daisies with eye makeup, a lash curler and mascara is probably like manna from above.  On days when eye makeup seems so much of an effort, mascara can create that wide-awake difference.  I admit that there are days, even for me, where  setting up primer, eyeshadow palette, brushes, etc etc.  can be just too much, like on weekends. Even on shoots, I try limiting my makeup on myself and focus on getting to the trick. I do know that behind-the-scenes photos would be appearing so to look just at least more awake on my eyes, I just groom my brows and curl my lashes and apply mascara.

The newest mascara from L’Oreal Paris, the False Lash Butterfly Mascara gives vavoom lashes by defining and enhancing our lashes to really make our eyes pop even without any eyeshadow. Even if your eye makeup is heavy that day, (I.e. very heavy smoky eyes), this mascara will make lashes still stand out and not look lost in strong eye makeup even without falsies.  Thanks to the lovely people of L’Oreal Paris who sent this over for me to try.


If you look at the brush, it’s not the usual teardrop-shaped mascara wand we’re used to seeing. The brush has actually an asymmetric  shape (the left side is different from the right).


 This is the key to making the lashes pop out more. The application is more precise, with product getting into the hard-to-reach lashes at the corner of the eyes.  As the product is deposited on the lashes.  The lashes stretch out (like the wings of a butterfly!) for a spread-out, wide-eye look with lashes that frame the eye.

Take note of the before and after photos.


my bare eye, just lashes curled


with False Lash Butterfly Mascara 

The False Lash Butterfly Mascara is also waterproof. I tried it, went to pole class and there are no mascara runs or flakes  on my face from sweat. I really needed very potent eye makeup remover to get this all out. Conditioning power is awesome and bridal makeup artists should have this in their kit, especially if the bride opts not to wear false eyelashes.

There are numerous ways of wearing the False Lash Butterfly Mascara. One of course, I have mentioned is on a bare eye, if you want to give your eyes oomph at minimal effort. You can wear this too with bridal makeup and your classic smokey eye, as shown here in the video. Check out the video on how to get the Le Papillon Eye Look and see how easy it is to do with L'Oreal products:


My own take too to this smokey eye is slightly darker and I used a coral lip.


I like how my lashes, even at a distance and not like a Tom Hooper-like close headshot, can still be seen. You can take this on a night out, party, or what the heck, even at a pole performance. Right I told you that these lashes can withstand intense pole class I had? Well yes, I model these looks on the pole.


Top: Brown Belly Yoga
Shorts: Landmark


Makeup Artist Karim Rahman created the Butterfly Looks – bold eye makeup designs where you can wear with your mascara. The looks are really edgy and pretty and I decided to do my interpretation of these looks.

A wearable look, the Flying Fluttery Look channels 60s sirens with exaggerated winged eyeliner. Think Amy Winehouse’s iconic eyeliner with lots of lashes framing it.  It’s a great party and performance look to do.


An edgier, bolder look that reminded me of Elizabeth Taylor in Cleopatra, is the Bold Nympha, which looks really cool in photos and would be a really cool makeup peg in a pole competition.


With lashes that defy gravity, I decided to  defy gravity as well. Like butterflies that take flight, I also take flight on the pole, because what better way to showcase these looks than to fly as well right? 

The Flying Fluttery on a Hummingbird


Sport Top: Zobha
Swimsuit Shorts: Sabre by Lizanne Cua

When I saw the Bold Nympha, I got my pole competition costume that I wore to Vie and Vault two years ago. As I said earlier, the defined strong eyes would really pop out onstage in fashion shows, performances.


Pole Costume by Dennis Celestial


If you want lashes that defy gravity,  L’Oreal Paris False Lash Butterfly Mascara is available for Php 695 at all L’Oreal Paris makeup counters. Get your lashes some #butterflyeffect and start posting your own #butterflyeffect, in air, land or water, since it’s waterproof.

Thursday, October 4, 2012

Faking it With Benefit's They're Real! Mascara

Ahhh, mascara, you are indeed a lazy girl's best friend. I mean, come on, we all love putting on makeup, but there are those days when it can be a chore since for one thing, it takes a whole lot of time to do makeup. What if you have other chores to do or somehow decided to take the day slow and embracing the yin of it all? For eyes that look more wide awake, I really rely on mascara. That instant definition of  curled lashes gives that wide-awake look and suddenly, you have eyes, and lashes. It's faster than putting fake lashes and much more comfortable too.

I purchased Benefit Cosmetics' They're Real! Mascara a few weeks ago after hearing good reviews from those who've tried it. The picture on the box got my un-mascara-ed eye popping because from ho-hum lashes, they instantly turned to vavoom lashes as according to the label, from a consumer-panel survey, these were the results:

94% dramatic length and volume
90% base-to-tip curl
94% saw visible lift
100% saw long-wearing results.

If it can turn eyes that are meh-level to yowza! level, then this must be worth a try.


I have to comment Benefit Cosmetics again, as they have such awesome packaging. This one looks like a spy weapon, like an elongated grenade or something.


I like the wand has got the end with bristles to get product wedged in those hard-to-reach areas. This could also be used by those with really sparse lashes or lashes on the bottom lashline to avoid those mascara speckles.


I didn't use makeup for the test here, though. Just the mascara. So that's my bare eye

Then I curled my lashes using my favorite lash curler. Sure, curling your lashes does give it a bit of definition.

To apply mascara, I got the brush, dabbed excess on a tissue, then wiggled the wand from base to tip

The bottom lashes, I used the pointy end 

Then after, you can see my new lashes.

It's not really super falsies effect. It still looks like my own lashes, except they're longer, darker, and more defined. Normally, volumizing mascaras thicken the strands so they plump up, but sometimes, they clump when you go a little too overboard. this one, I'm happy to say didn't but just to be sure, don't go too overboard with the coats (3 is fine). From my personal experience, it didn't weigh my lashes down and it still looked pretty defined and natural. Natural with impact. I could actually use this alone with no eyeliner.

Closed eye detail.

Just a reminder though, if you're a bride, and you know that you'll be crying, this isn't a waterproof mascara. it is, however, long-wearing so it can withstand probably an entire day or even a workout session (I worked out to this). Don't worry, non-waterproof formulas aren't that bad. We need them to give our lashes a break once in a while from those waterproof formulas, which can be a pain to remove everyday. Just use this if you have that extra-special occasion that you know you won't cry or submerge your face in water. We all deserve to be pretty everyday right? Even while giving our lashes a rest.

Benefit's They're Real! mascara retails for Php 1,200 and it's available at all Benefit counters. It's a bit more expensive than most mascaras, so this belongs to my treat-to-self category of mascara. It does last long, however, especially if you take good care of it. For pro use, I recommend using this in beauty shoots or editorials with natural-makeup pegs without using false eyelashes. 

Some tips:
  • Never, ever, pump the wand into the bottle. This could cause air to get trapped inside, thus drying and/or clumping the product.
  • For small eyes, make them appear wider, rounder, and larger, by concentrating application on the center lashes instead of the edges. 
  • To elongate very round eyes, concentrate on the outer edges. It's almost like the wing-tip eyeliner or wing lashes. 
  • Blot used wand with a tissue before storing. This would avoid clumps. 


Friday, March 30, 2012

Reviewing Shu Uemura Hard Formula Hard 9 Eyebrow Pencil

Aside from their very epic cleansing oils, which have gotten rave reviews all over the world and still remains a cult favorite, one of Shu Uemura's favorite products is their eyebrow pencils. I'm eyebrow makeup-obsessed and I'm always on the lookout for really good eyebrow makeup. Makeup artists that I know have raved about this too saying how easy this can be used and it gives very natural results, even if you're a beginner. It's rated 5.0 out of 5 by Makeupalley members too! Yay.

[image from makeupalley.com]

When you first purchase your very first Hard 9 eyebrow pencil, you would see that it looks like an ordinary pencil for drawing. After your purchase, you should have a Shu Uemura artist sharpen the pencil for you. But wait? Isn't it a brand-new pencil? So why sharpen it? The thing is, there's a different way of sharpening this pencil. It's sharpened with a blade in a blade/sword-like shape. Shu Uemura artists undergo intensive training to master that skill of sharpening Hard 9 pencils perfectly.


 The difference though is that the pencil's core is harder (hence the name hard 9) than most regular eyebrow pencils. If you swatch it on your hand, it would be hard to tell where the pencil mark is.


On eyebrows however, they somehow react to the oils on the brow to create a very natural and soft line.


I understand that some girls love the convenience of pencil since they don't have to bring an extra brush. Pencils however can be tricky since a little pressure or wrong turn could result to the hideous stamp-pad brows. We want perfect Brooke Shields eyebrows, not horror movie ones. Each stroke on the brow made by the pencil is very subtle delivering soft color, and never harsh. It's easy to fill in sparse or bald brow spots, extend the brow tail, or make the brows more defined. The intensity is buildable, so one stroke isn't too harsh. It's great both for makeup artists and consumers as it's so easy to use. It's also a long-lasting product so you have brows until the end of the day instead of ending with the tail cut off (provided you don't scratch or rub vigorously, of course).


Right now, the shade I'm using is called Walnut Brown. It's lighter and a bit warmer, almost like a mixture of MAC Lingering and Girl Boy. I chose Walnut Brown since I had my hair lightened to a soft ash color for summer. For those with darker head hair colors, Seal Brown could be a best bet.

What I like about it? The ease of use, the result, and convenience. It's perfect for those who are really busy and don't have time for an hour of makeup. What I don't like about it? Well, of course there's the price (Php 1,400) and the fact that you have to take this to a Shu Uemura counter when you want it sharpened. It's a nice product to have in your makeup kit. For personal use, this can be like a special reward or treat for yourself.

Sunday, March 4, 2012

Tutorial: Angelina Jolie at the Academy Awards-Inspired Eyes + CONTEST!!!!


Do you like the Suesh Smoky Eyes Brush Set? Well, I did and here's a tutorial I made inspired from one of Hollywood's most beautiful faces from the recent Academy Awards - Angelina Jolie. Angie never fails to be absolutely gorgeous no matter what, even with minimal makeup on a boat in Cambodia. At the red carpet, she's gorgeous as ever.


Nevermind the weirdness of the leg in photos (with legs like her, we have no right to complain), Her makeup has the perfect balance of eyes and lips - both are defined with her trademark cat eyes and - boing!!! - red lips. Full-lipped ladies like Angelina can wear red, and how flattering this red is! However, in this tutorial, we focus on the eyes. I did a look inspired from that, a very wearable, subtle smokey eye that you could take from day to night. I used only four colors and four brushes. Most of the colors are in fact, in the neutral side, so anyone can wear this and they go with any lip color you want - red like Angelina, nude, or pastel pink, it's up to you. Just match the lip color with the blush so everything looks tied together.

So let's get started shall we? As you can see, I used certain products for this look, but feel free to use products you're comfy with. I'll just describe the shade for you to know what to use okay? So let's get started. I started with prepping the face first, then defined brows and applied primer for the makeup to stick.


STEPS:

Using a peachy-nude, matte eyeshadow, apply this color from lashline to lid using the large eyeshadow brush.


Contour the crease with matte warm brown eyeshadow using the small eyeshadow brush. You can deposit pigment on the crease with the dome smudge brush and then blend with the small eyeshadow brush for more intensity.


Create a drop shadow by using the same brown eyeshadow on the lower lid with the angled eyeliner brush.


Eyes should look like this: a bit defined, but okay.


Line the eyes with a smoky eye staple: Black pencil eyeliner. I lined the bottom lashline 2/3 of the way and full on the upper lash and slightly extending upward to create a "wing".Set the liner with black eyeshadow using the dome smudge brush for the smoky intense look.


You can blend the upper liner with the smudge brush like so for that intense cat eye look Angie is known for.

For a bit of 3d sparkle, I applied sparkly loose eyeshadow in a neutral peach color on the lids and blended it. I also used this on the tear duct to highlight and a bit on the browbone.


For more prettiness, mascara comes to the rescue. Choose a mascara that instantly pumps lashes into vavoom hotness. False lashes may be added.

And here you go... an eye look that's very easy and pretty using the Suesh Smokey Eyes Brush Set.


I'm feeling generous today and so I'm giving away three Smokey Eyes Brush Sets to three very lucky readers. All they have to do is answer the question below:

How would you create and wear your smoky eye design?

Post the answer to the comments section after this entry with your full name of course! Contest will run this week and it would end March 11. :) Good luck lovies!